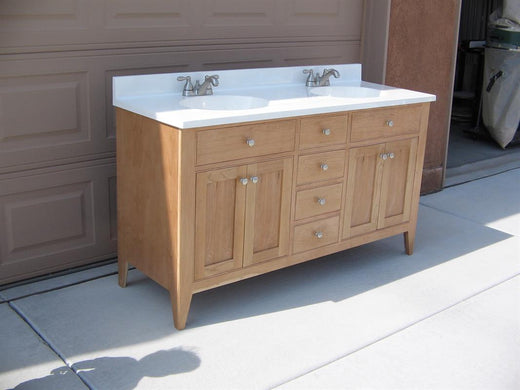
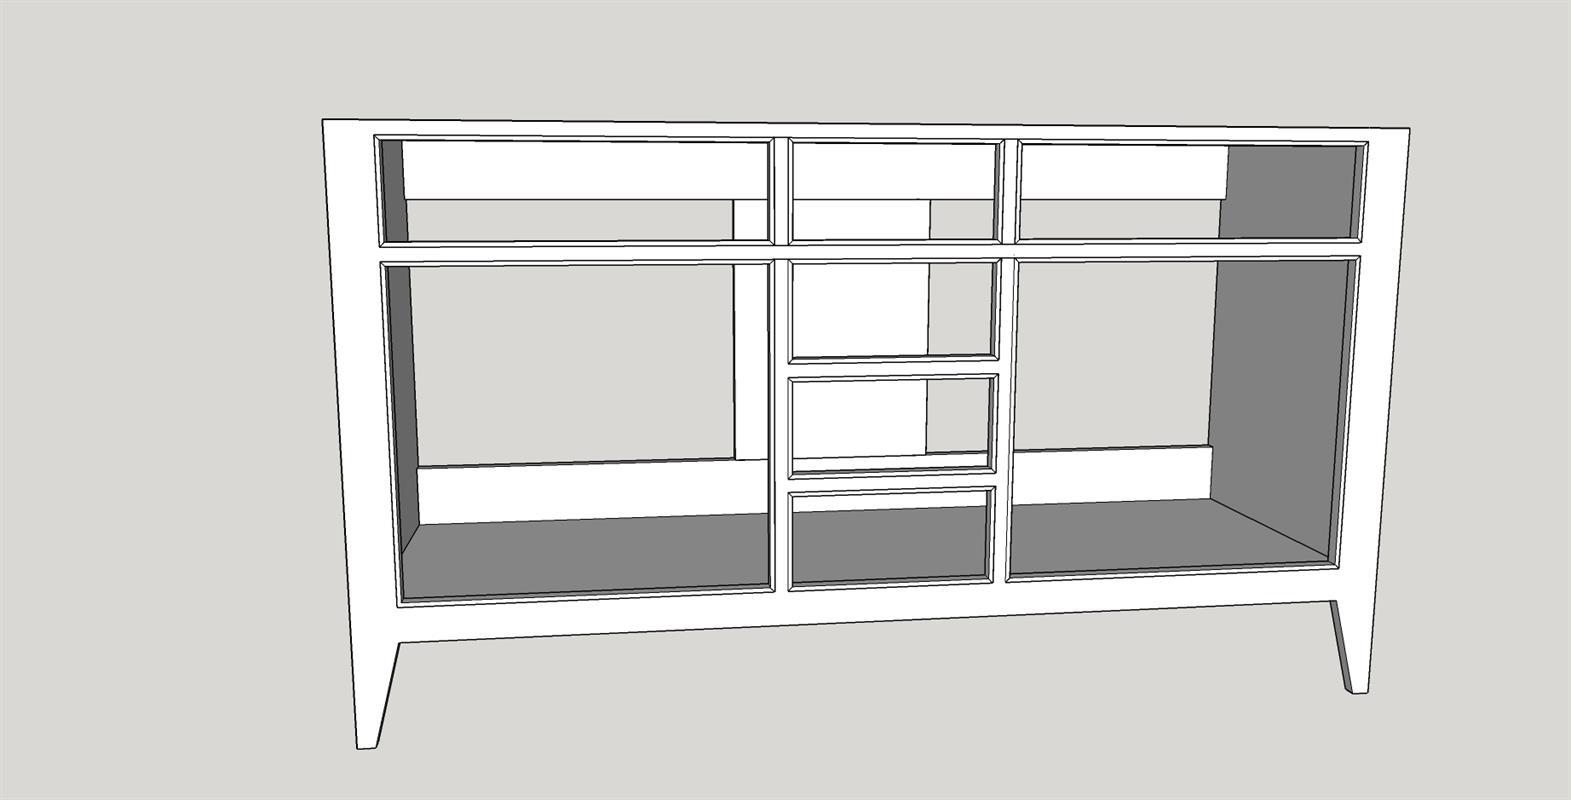
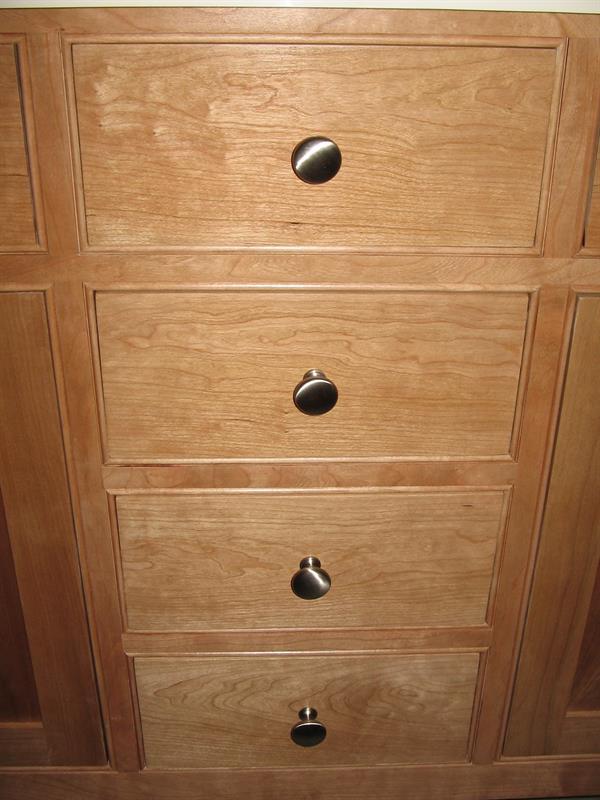
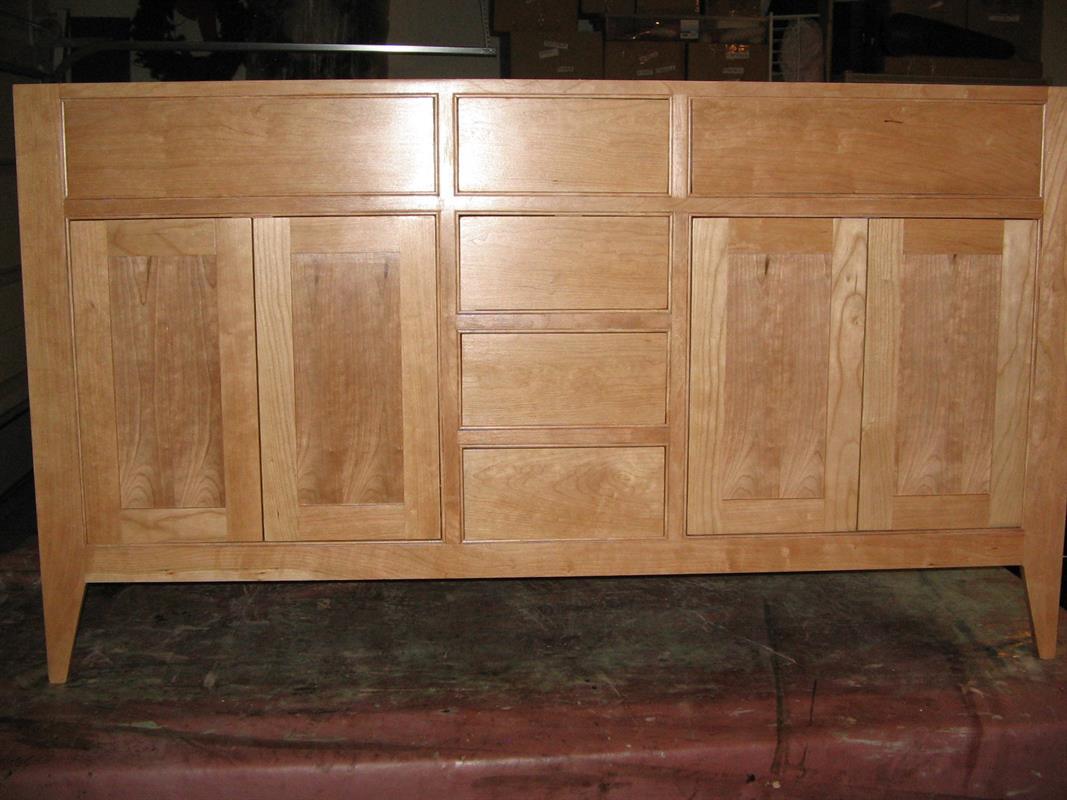
Shaker stil kirsebær høy badekar forfengelighet med en 2 vask topp. Skapet har 4 sentralt plasserte skuffer. Det er 2 falske skuffefronter og doble dører på hver side av skuffestabelen. Dørene og skuffene er innfelt og bruker en perledetaljer for å fremheve åpningene.

Vanskelighetsgrad: Moderat
Materialer:
Treprodukter
- Kirsebærkryssfiner (1) – 3/4" Tykk, helark → 19 mm x full arkstørrelse (vanligvis 1220 mm x 2440 mm)
- Kirsebærkryssfiner (1) – 1/4" Tykk, halvt ark → 6 mm x halvt arkstørrelse (vanligvis 1220 mm x 1220 mm)
- 3/4" Kirsebær (2) – 1x12 x 96" → 19 mm x 305 mm x 2438 mm
- 1/4" Eik (1) – 1x8 x 48" → 6 mm x 203 mm x 1219 mm
- 2" Poppel (1) – 8/4 x 8 x 36" → 51 mm x 203 mm x 914 mm
- 3/4" Poppel (2) – 1x8 x 72" → 19 mm x 203 mm x 1829 mm
- 3/2" Poppel (3) – 1x6 x 96" → 38 mm x 152 mm x 2438 mm
Maskinvare og rekvisita
- 8 Euro-stil skjulte hengsler (Liberty Hardware HC11SJC-NP-C5)
- Omtrent 100 Kreg 1 1/4" Lommeskruer (både fine og grove)
- 10 skuffer/dørtrekk (ditt valg)
- 12 slipepapir og skiver (100 - 220 korn)
- 1 minvoks polykryl sateng finish
- 1 Titebond I Trelim
- Omtrent 100 1 1/4" Brad Nails
- Omtrent 100 3/4" Pinnegler
- 8 1" Selvskjærende treskruer
Kuttliste og deler
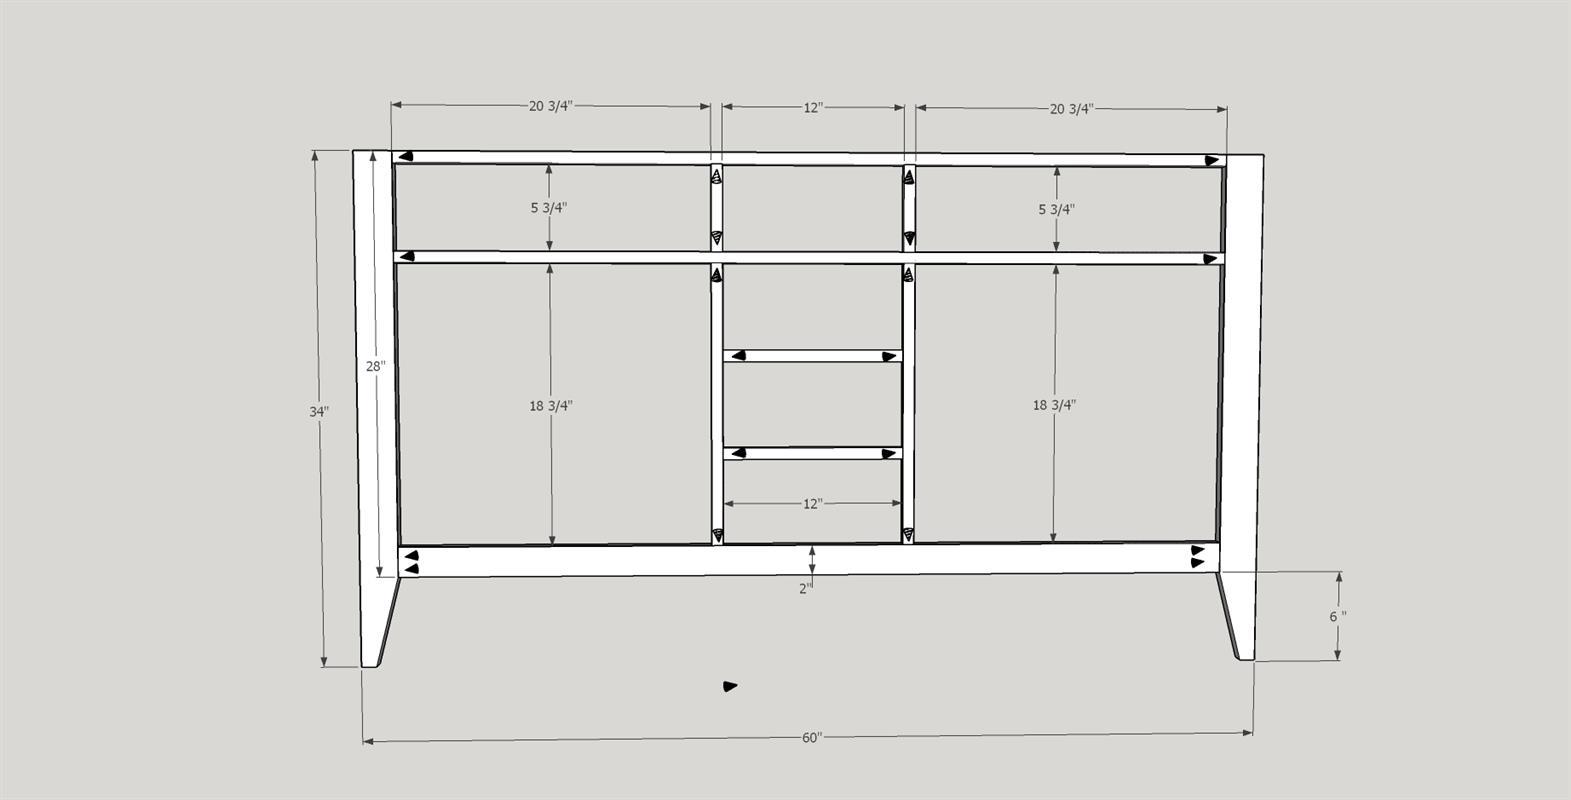
Ansiktsramme - Cherry:
-
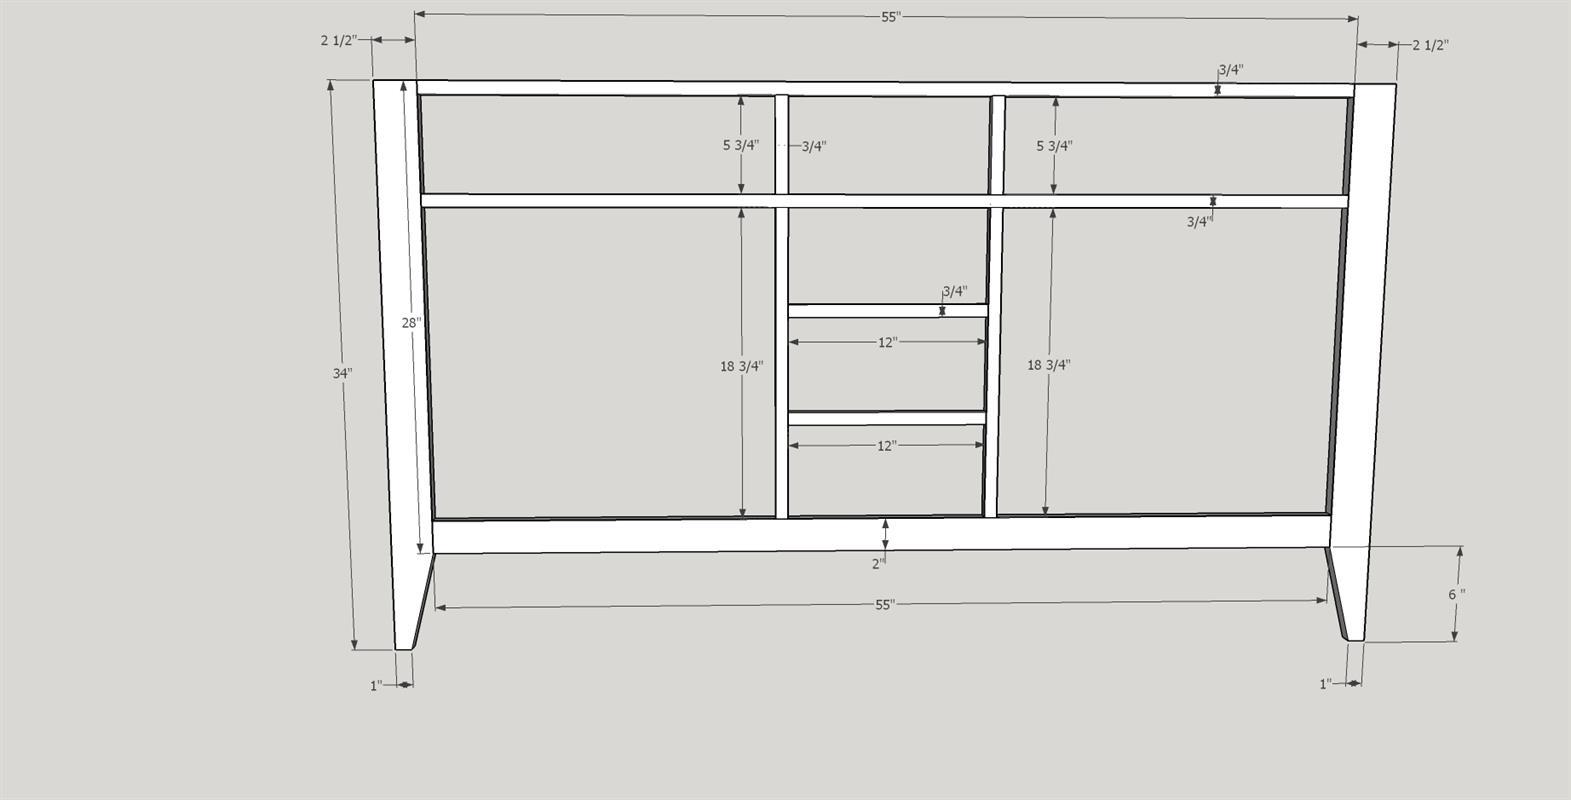
Utenfor stiler (2):
3/4" x 34" x 2 1/2" → 19 mm x 864 mm x 64 mm -
Bunnskinne (1):
3/4" x 55" x 2" → 19 mm x 1397 mm x 51 mm -
Topp- og innvendige skinner (2):
3/4" x 55" x 3/4" → 19 mm x 1397 mm x 19 mm -
Øvre innvendige stiler (2):
3/4" x 5 3/4" x 3/4" → 19 mm x 146 mm x 19 mm -
Nedre innvendige stiler (2):
3/4" x 18 3/4" x 3/4" → 19 mm x 476 mm x 19 mm -
Innvendige skinner (2):
3/4" x 12" x 3/4" → 19 mm x 305 mm x 19 mm -
Perler (8):
3/4" x 20 3/4" x 1/4" → 19 mm x 527 mm x 6 mm -
Perler (8):
3/4" x 12" x 1/4" → 19 mm x 305 mm x 6 mm -
Perler (12):
3/4" x 5 3/4" x 1/4" → 19 mm x 146 mm x 6 mm -
Perler (4):
3/4" x 18 3/4" x 1/4" → 19 mm x 476 mm x 6 mm -
Falske skuffefronter (2):
3/4" x 20 1/4" x 5 1/4" → 19 mm x 514 mm x 133 mm -
Skuffefronter (4):
3/4" x 11 1/2" x 5 1/4" → 19 mm x 292 mm x 133 mm -
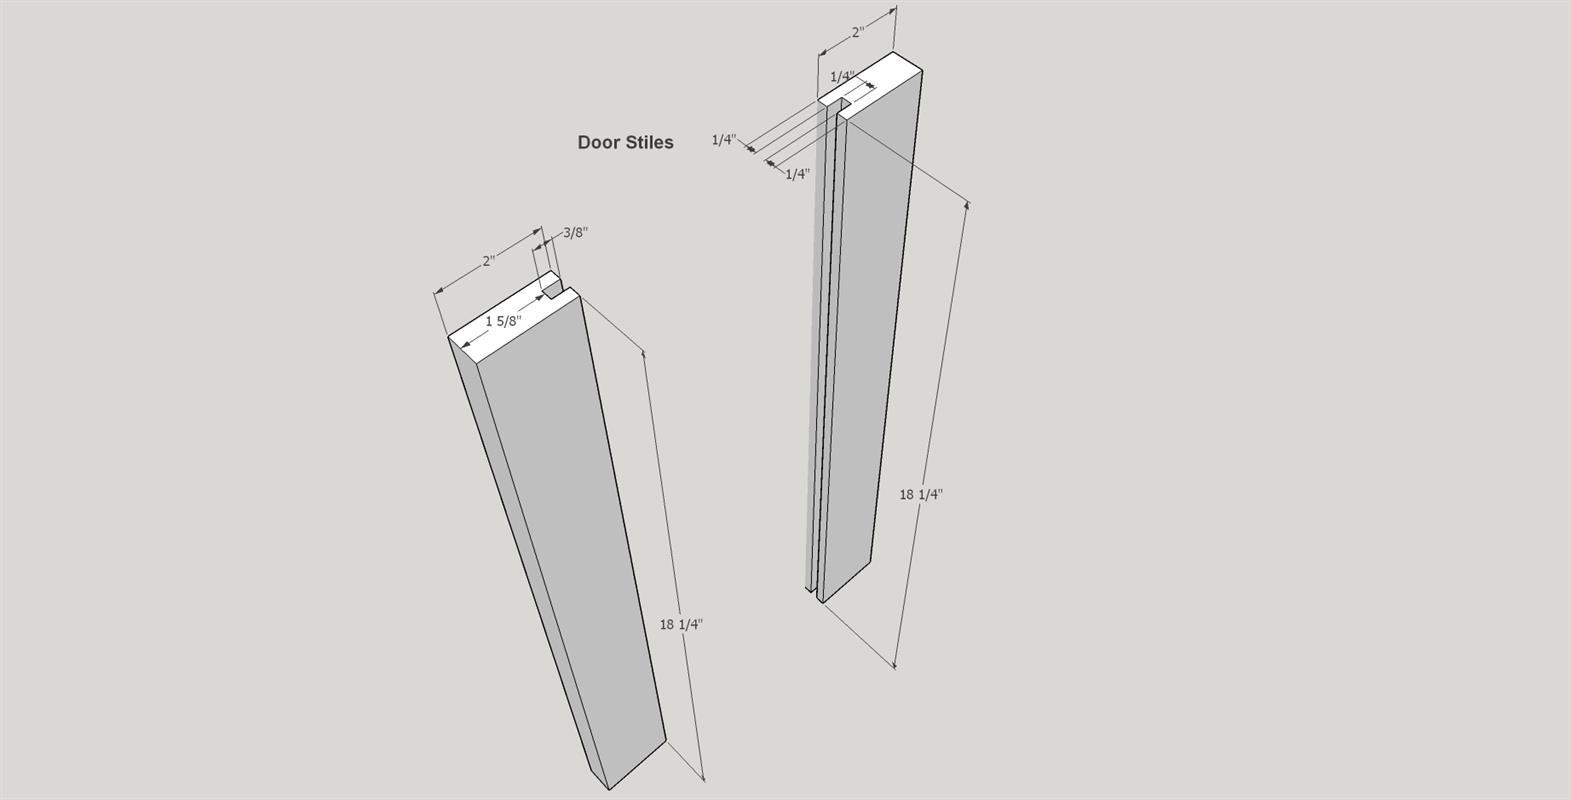
Dørstiler (8):
3/4" x 18 1/4" x 2" → 19 mm x 464 mm x 51 mm -
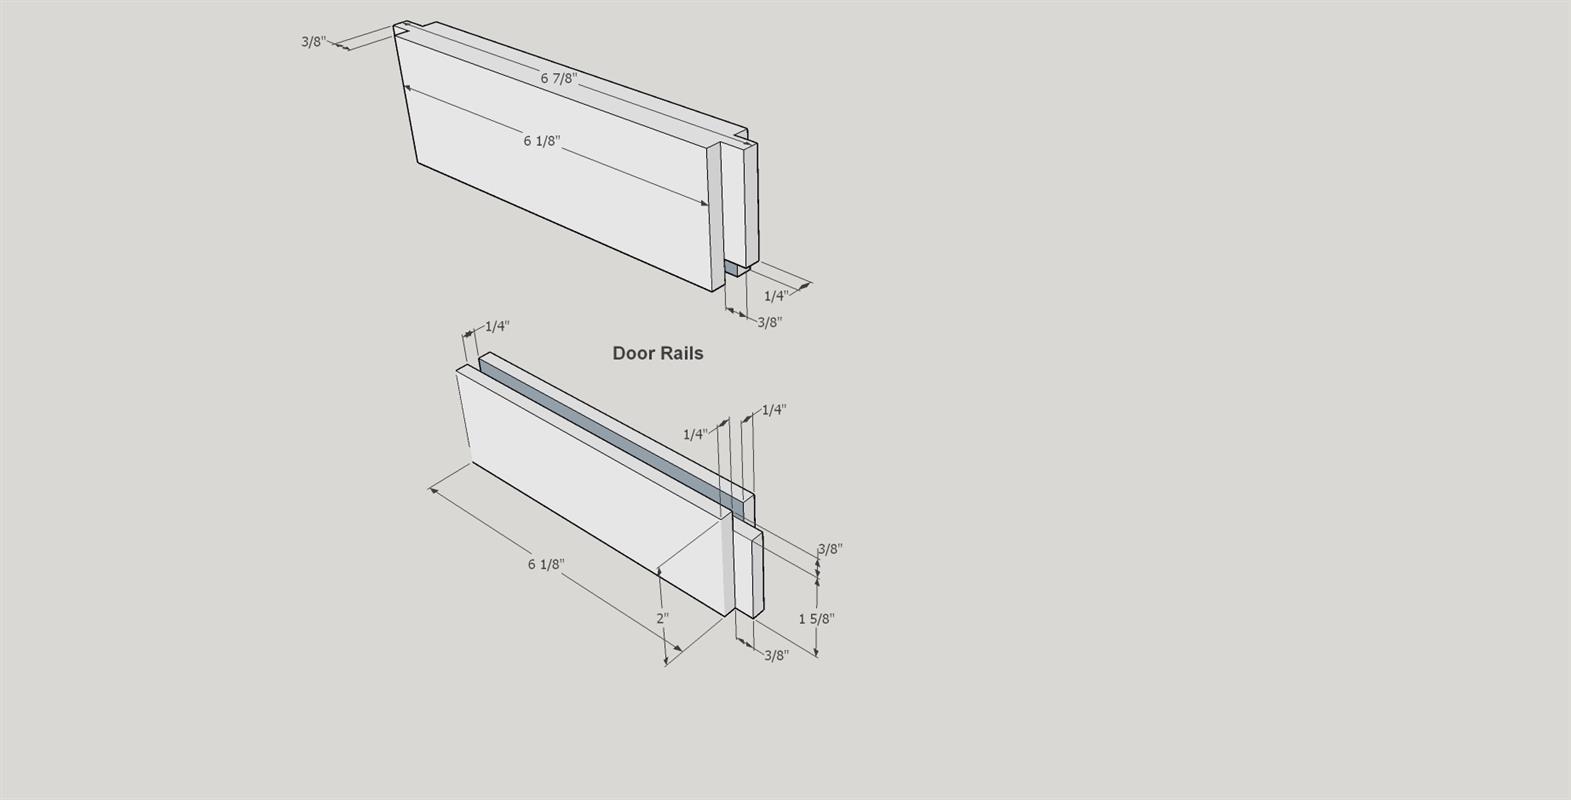
Dørskinner (8):
3/4" x 6 7/8" x 2" → 19 mm x 175 mm x 51 mm
Skuffesklier - Eik:
-
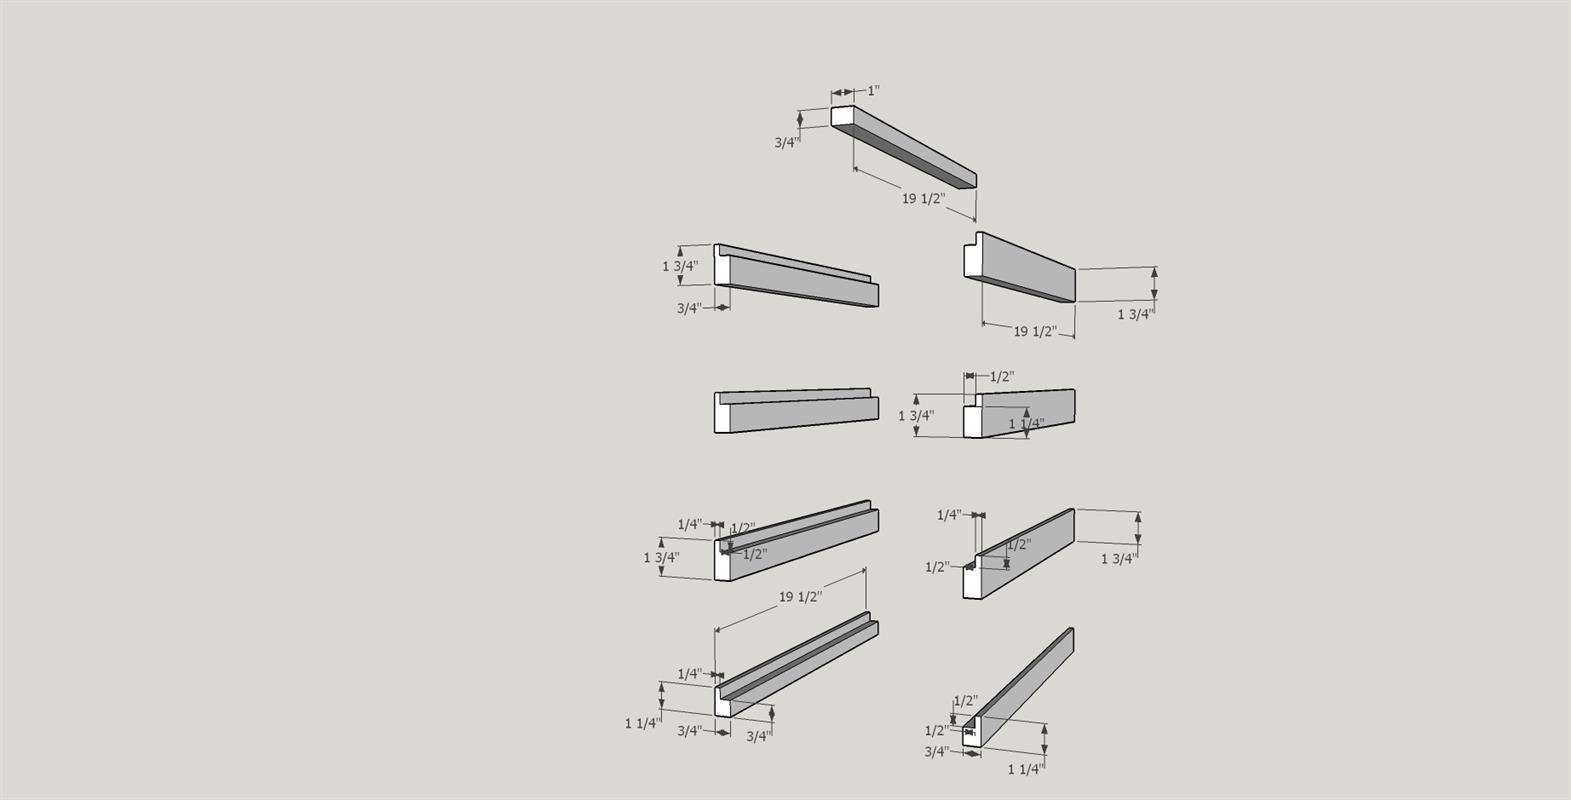
Skuffeslider (6):
3/4" x 19 1/2" x 1 3/4" → 19 mm x 495 mm x 44 mm -
Nedre skuffeslider (2):
3/4" x 19 1/2" x 1 1/4" → 19 mm x 495 mm x 32 mm -
Øverste skuffholder (1):
3/4" x 19 1/2" x 1" → 19 mm x 495 mm x 25 mm
Rammestøtter - poppel:
-
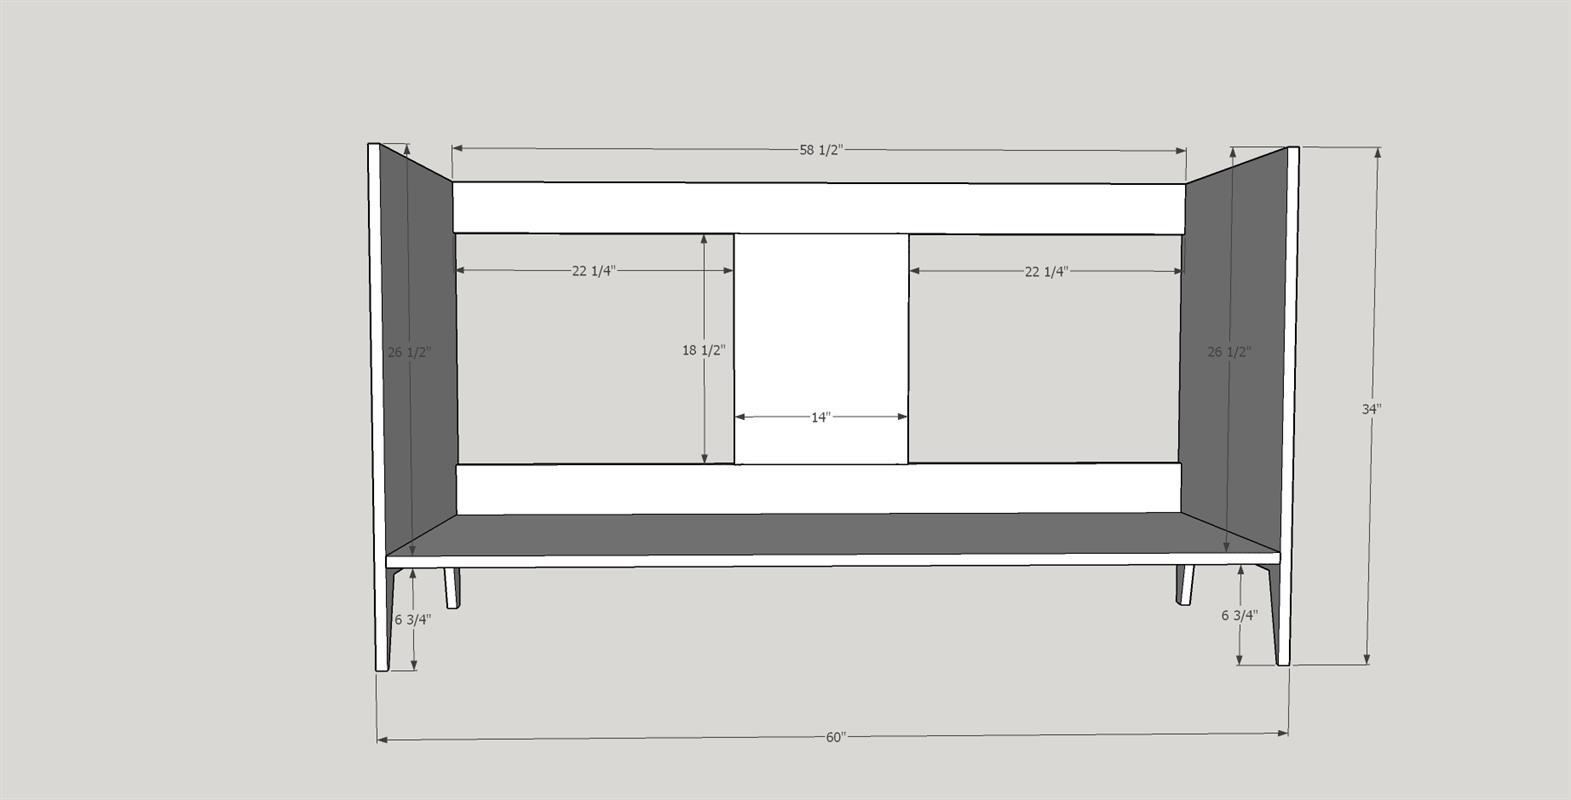
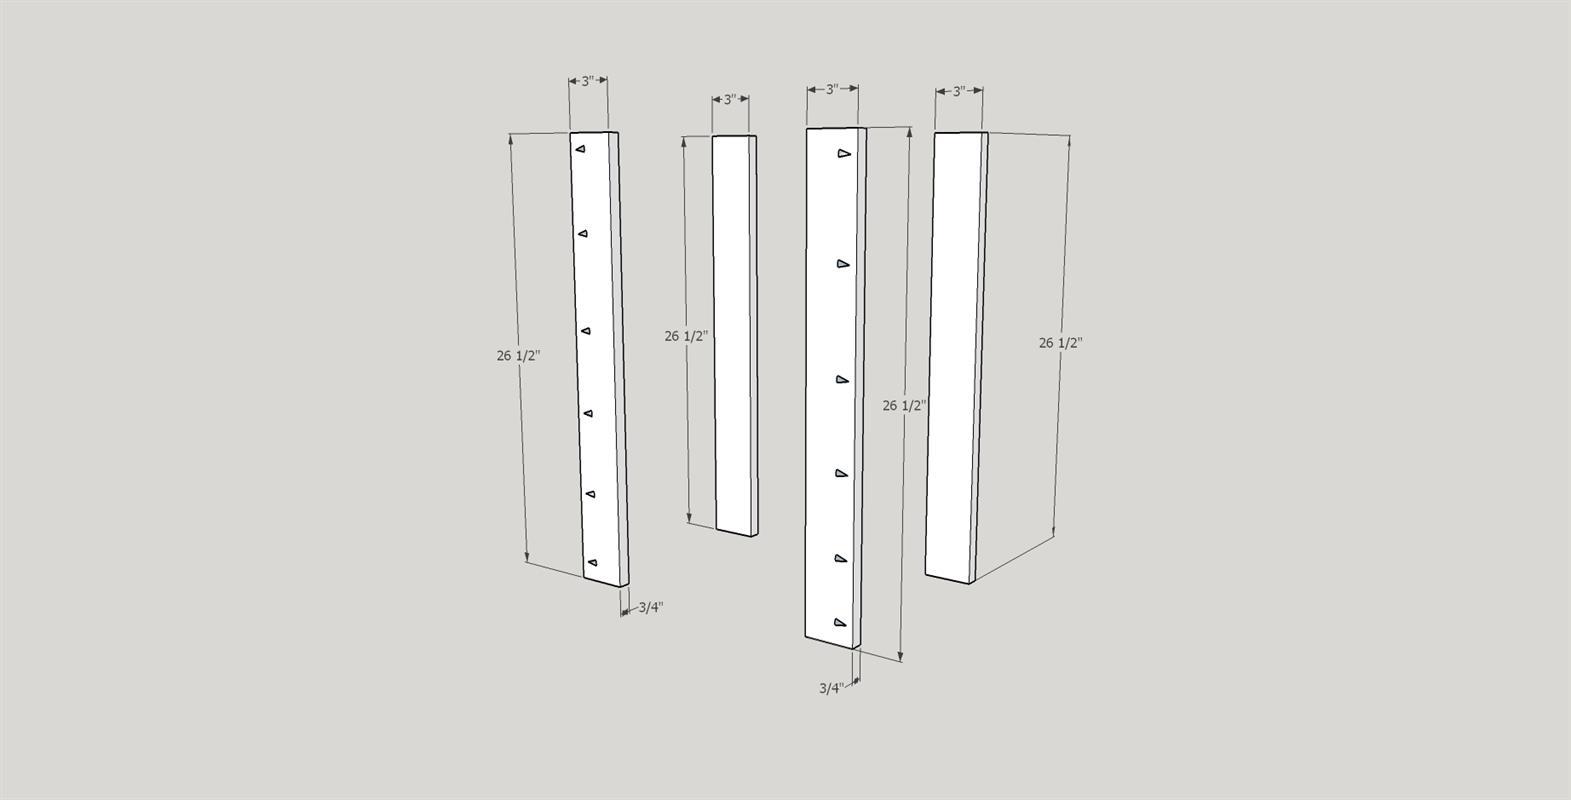
Utvendig dørhengselrammestøtter (2):
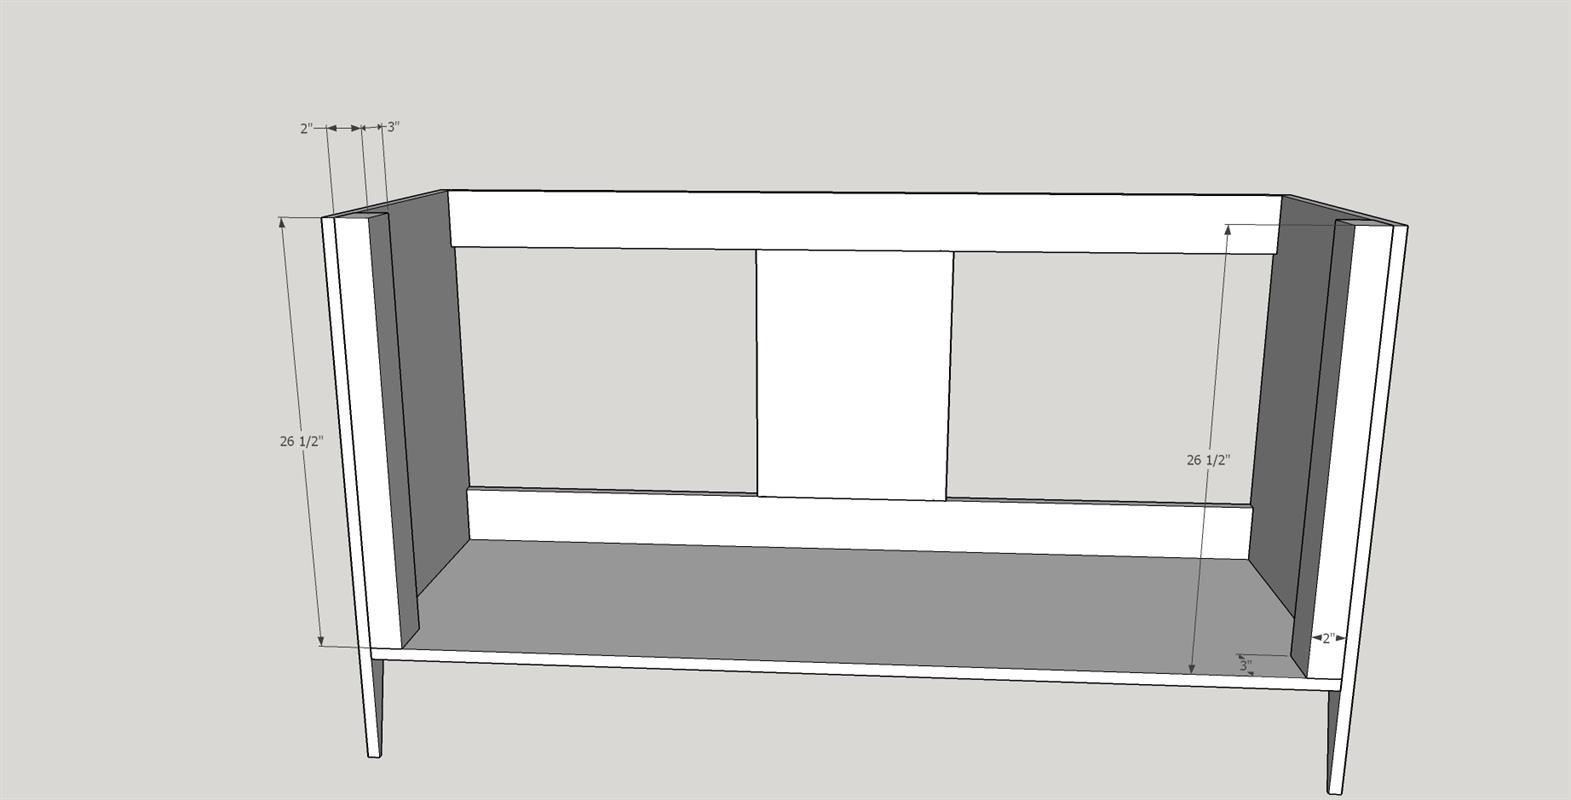
2" x 26 1/2" x 3" → 51 mm x 673 mm x 76 mm -
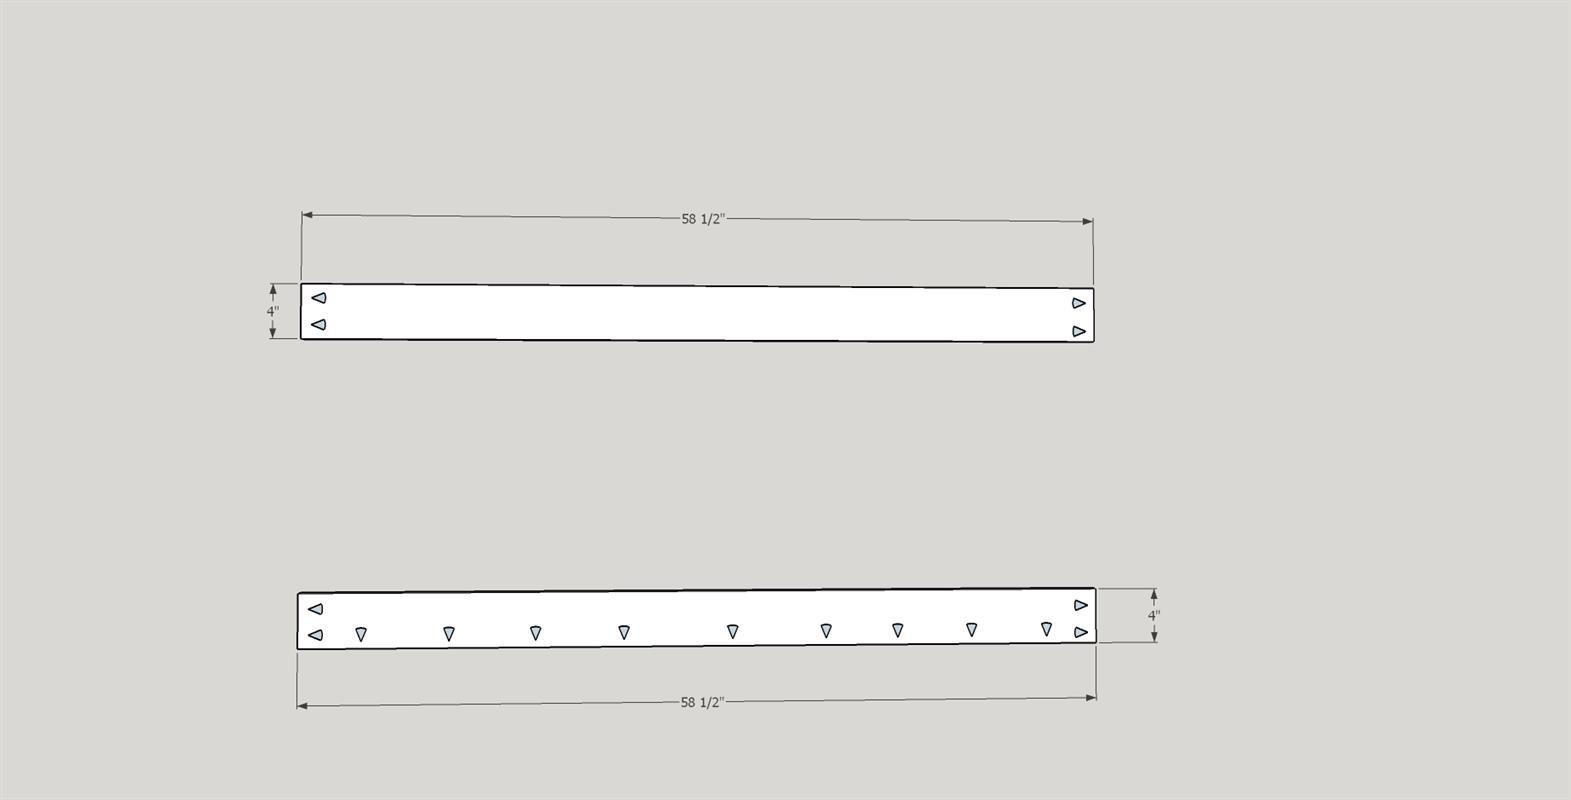
Bakramme topp og bunn (2):
3/4" x 58 1/2" x 4" → 19 mm x 1486 mm x 102 mm -
Skuffeskyvestøtter (4):
3/4" x 26 1/2" x 3" → 19 mm x 673 mm x 76 mm
Skuffeboks - poppel:
-
Skuffeboks foran og bakside (8):
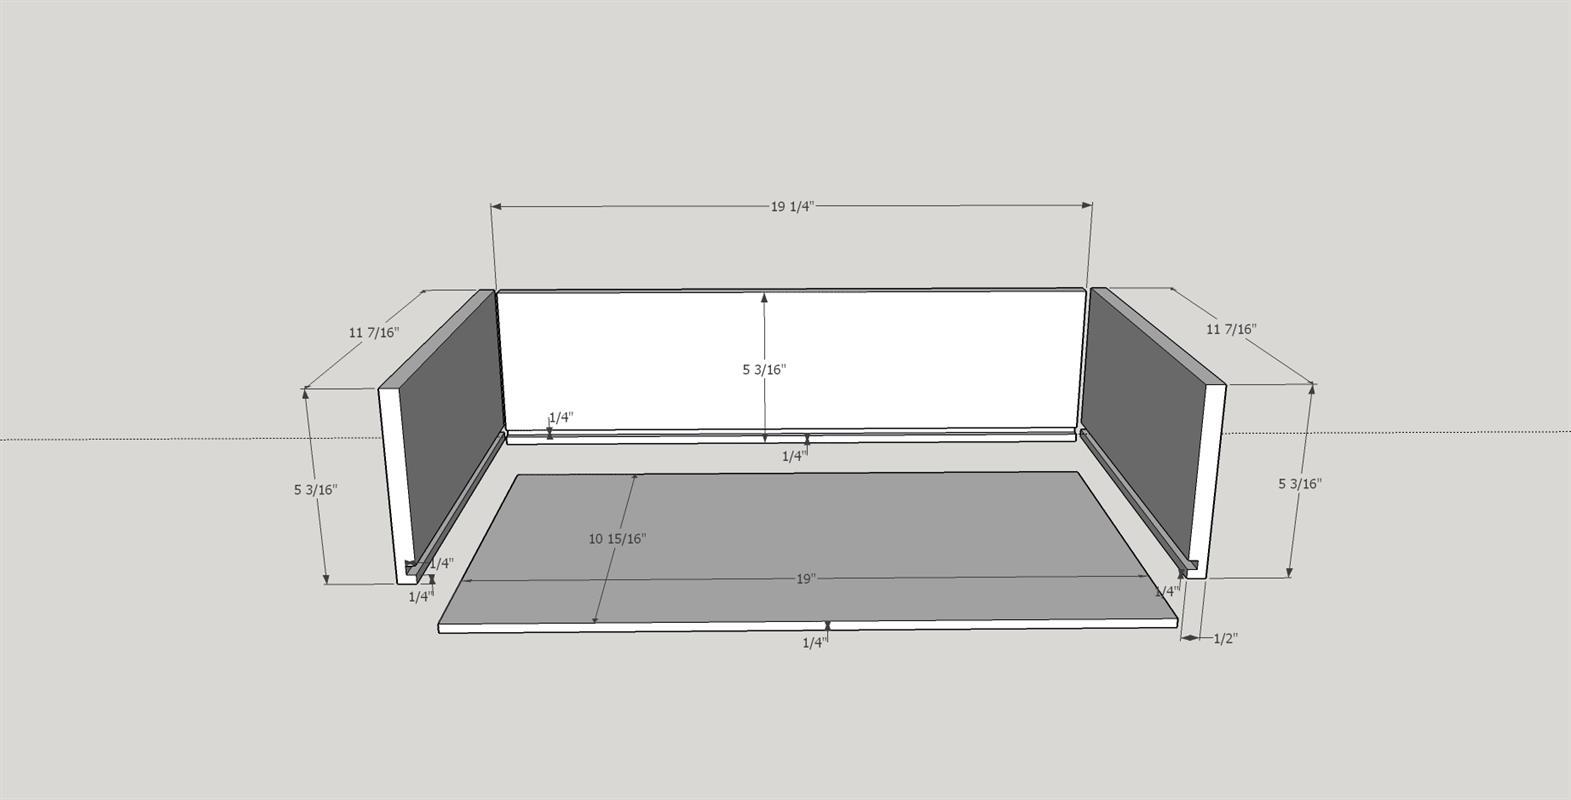
1/2" x 11 7/16" x 5 3/16" → 13 mm x 291 mm x 132 mm -
Skuffebokssider (8):
1/2" x 19 1/4" x 5 3/16" → 13 mm x 489 mm x 132 mm
Kirsebær kryssfiner:
-
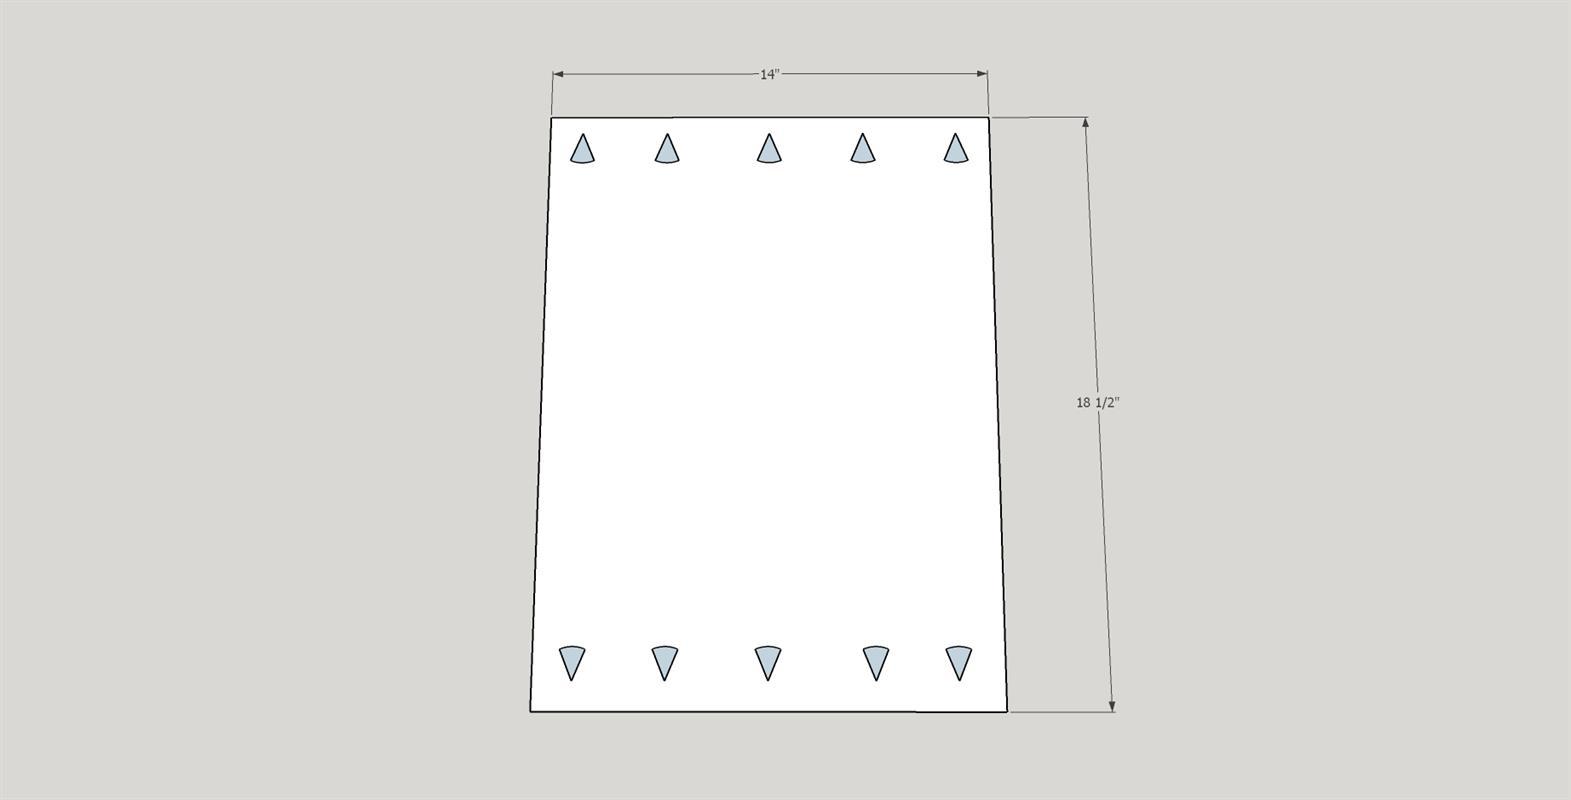
Bakre skuffstøtte (1):
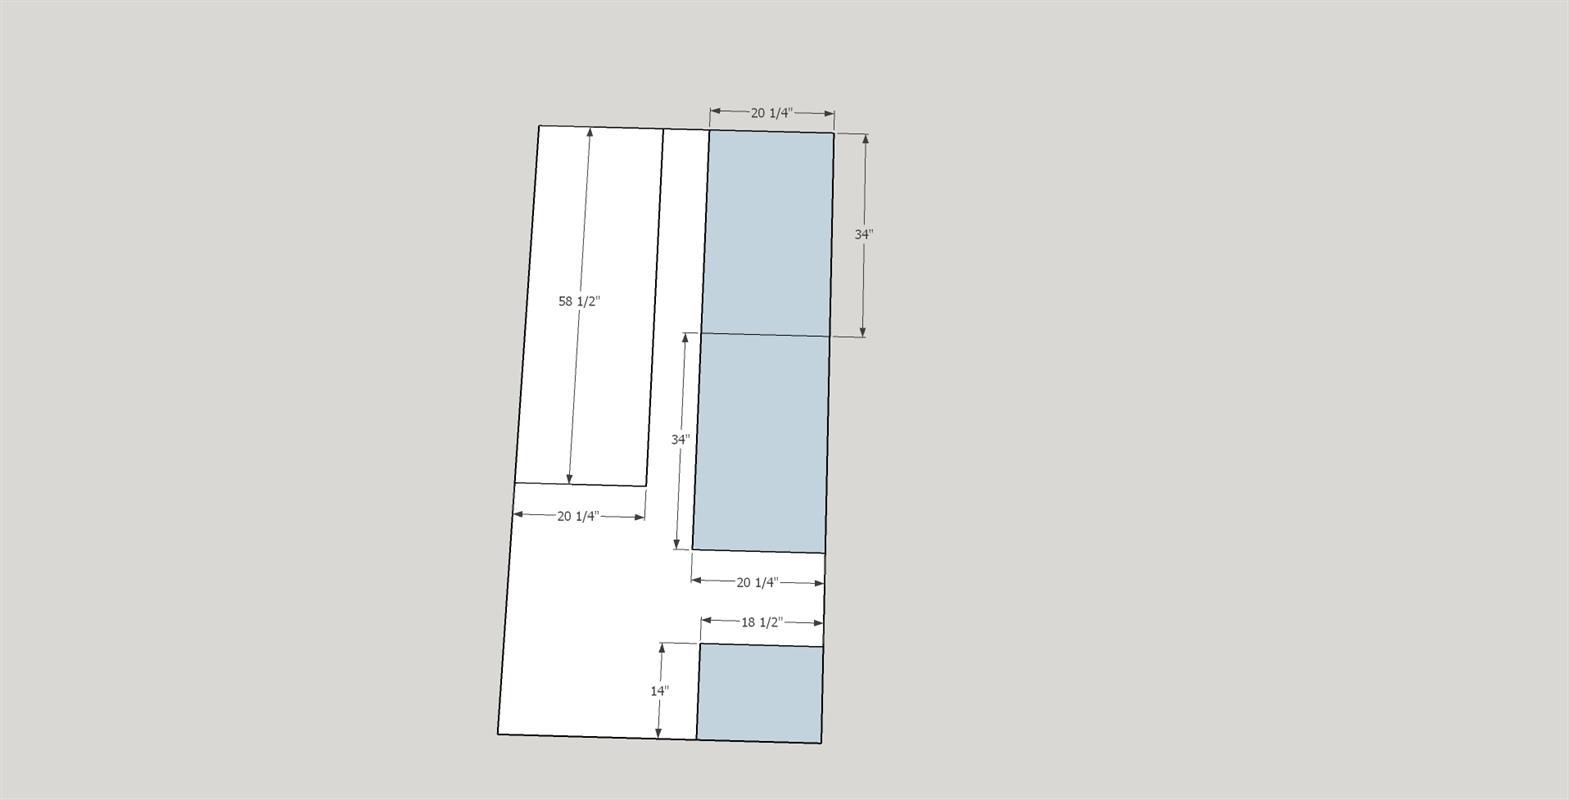
3/4" x 18 1/2" x 14" → 19 mm x 470 mm x 356 mm -
Nederst (1):
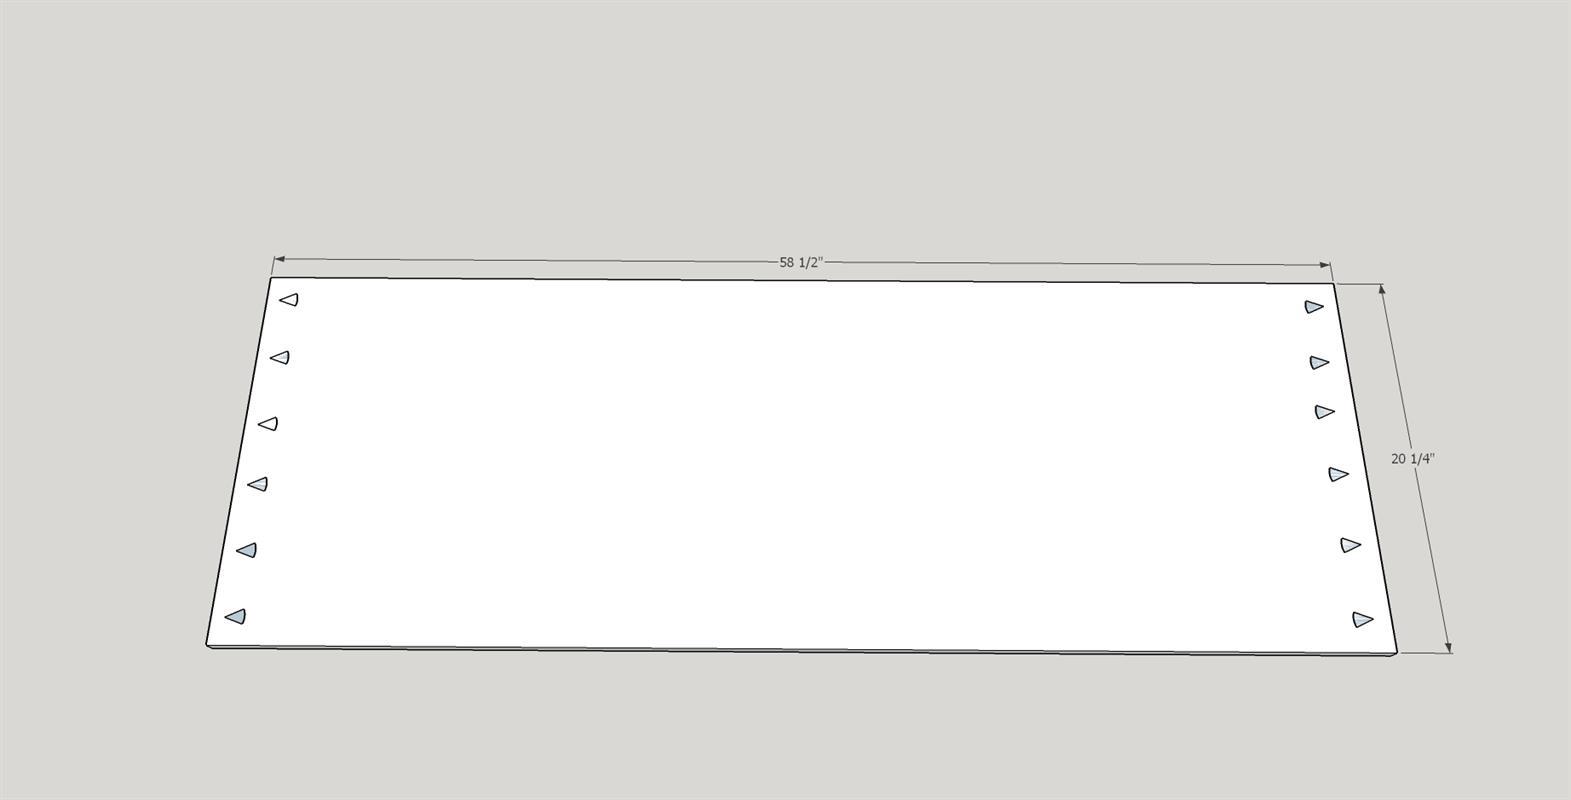
3/4" x 58 1/2" x 20 1/4" → 19 mm x 1486 mm x 514 mm -
Sider (2):
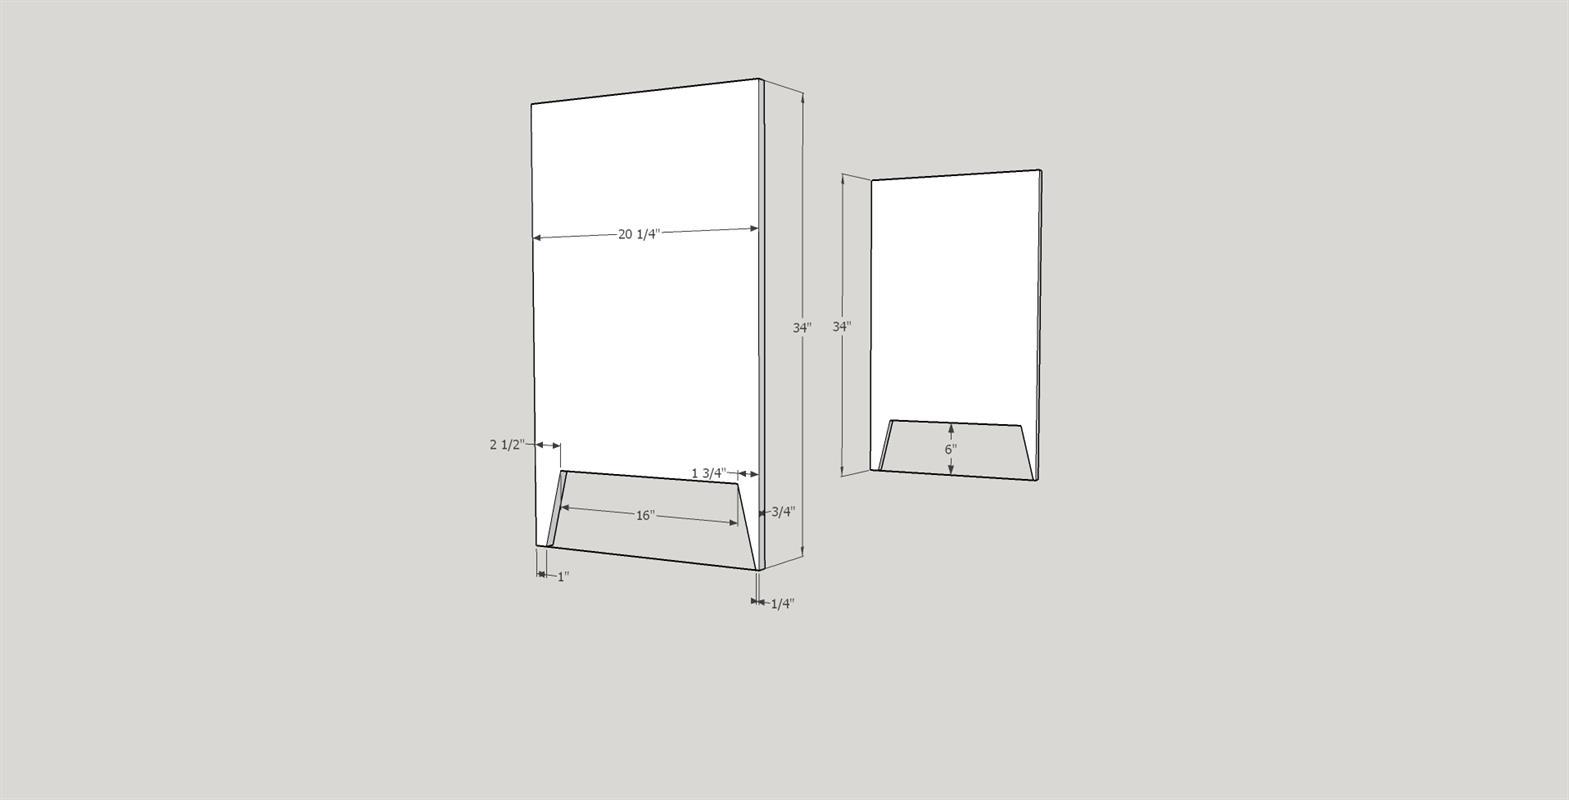
3/4" x 34" x 20 1/4" → 19 mm x 864 mm x 514 mm -
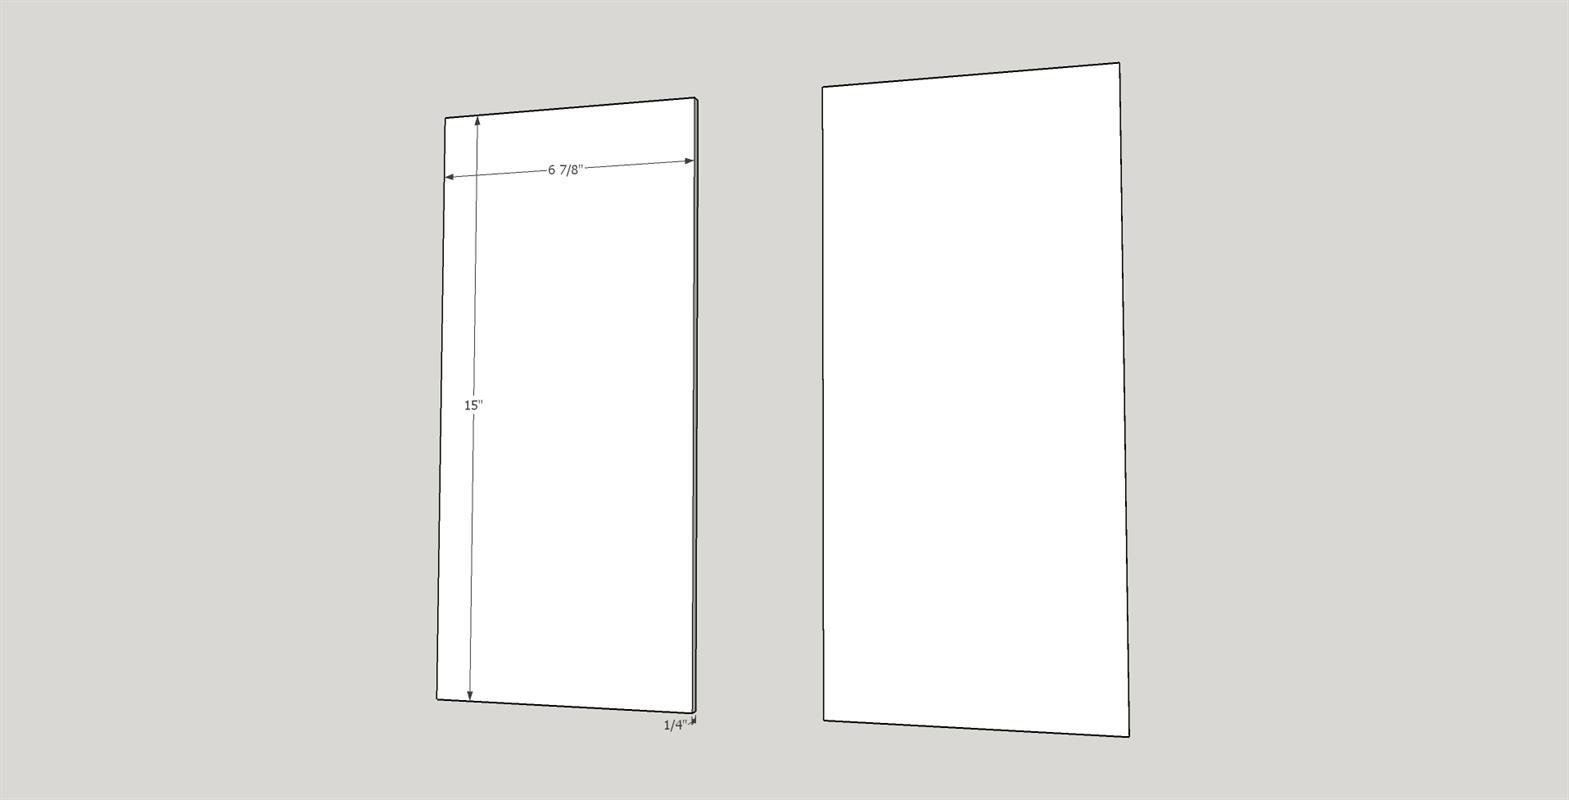
Dørpaneler (4):
1/4" x 15" x 6 7/8" → 6 mm x 381 mm x 175 mm -
Skuffebunner (4):
1/4" x 19" x 10 15/16" → 6 mm x 483 mm x 278 mm -
Dørstoppere og frontholdere for falske skuffer (10):
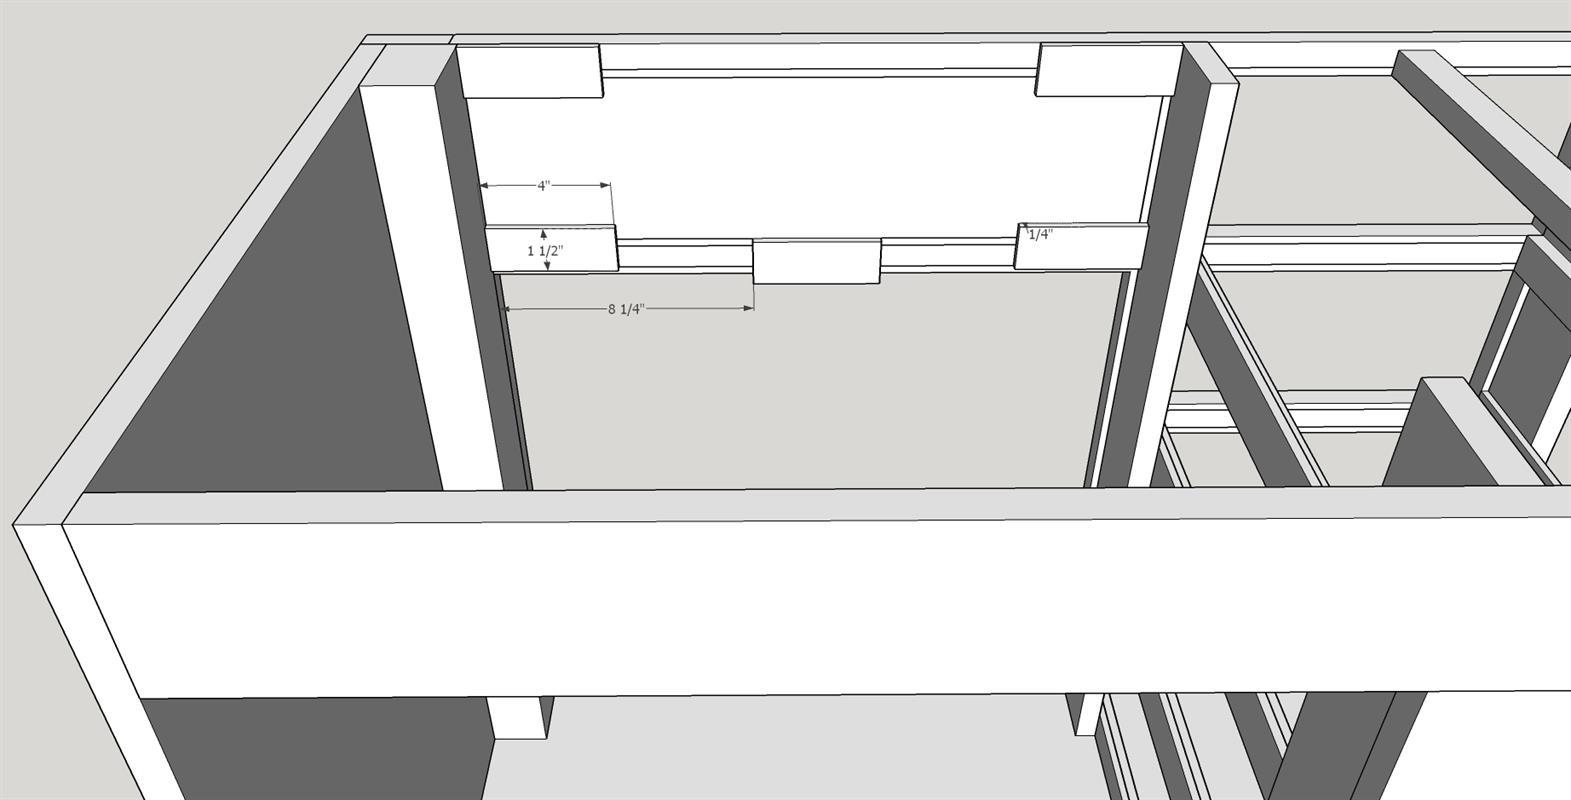
1/4" x 1 1/2" x 4" → 6 mm x 38 mm x 102 mm
Veibeskrivelse:
-
Trinn 1 - Klipp ut hoveddelene av kadaver
Skjær servantsidene, bunnen og bakre skuffstøtte fra 3/4" kryssfinerplate.
2 - Kutt benåpninger
Ved hjelp av en båndsag eller stikksag kuttes benåpningene i begge sidestykkene. Vær forsiktig for å få et jevnt kutt uten å rive ut. Husk også at du skal kutte en venstre og høyre side ... så hold den flotteste siden ut på begge.
-
Legg til lommehull i hovedskrotten
Bruk Kreg lommeskruejigg (sett til 3/4" for alle lommer på dette prosjektet), bor lommehull i begge ender av 3/4" kryssfinerbunn kuttet i trinn to. Det er lurt å markere hvor du setter hullene for å unngå feil.
-
Klargjør bakramme
Kutt 2 bakrammeplater fra 3/4" poppel. Bruk Kreg jig til å plassere lommehull i begge ender av topp- og bunnstykket. Plasser også lommer langs underkanten av bunnstykket. Igjen er det en god idé å merke av hvor du skal plassere lommene for å unngå feil.
-
Legg til lommehull i skuffestøtten
Bruk Kreg jig til å plassere lommehull i både toppen og bunnen av 3/4" bakre skuffstøtte i kryssfiner (kuttet i trinn to). Igjen er det en god idé å merke av hvor du skal plassere lommene for å unngå feil.
-
Sett sammen kadaver
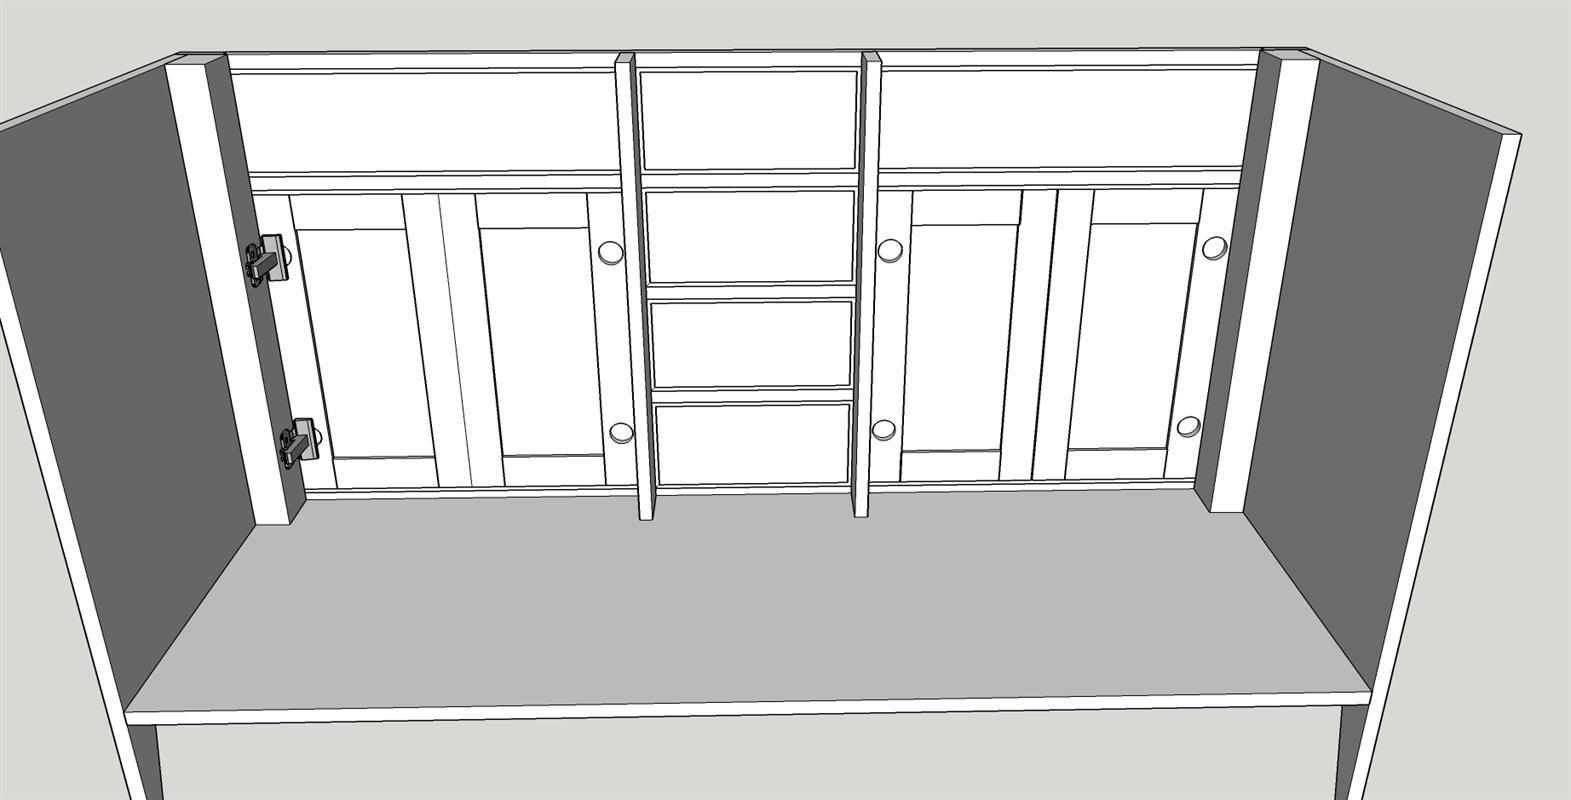
Sett sammen sider, bunn, bakramme og bakre skuffstøtte med Titebond trelim og 1 1/4" grove Kreg lommeskruer. Vær oppmerksom på...alle lommeskruer på bunnen skal vende ned og alle lommeskruer på baksiden skal vende bakover. Ingen lommer skal være synlige på innsiden av monteringen.
-
Sand
Sand alle bitene du har forberedt så langt. Jeg bruker vanligvis 100 grit til å begynne med og avslutter med 150 grit. Det er mye lettere å fullføre denne fasen med sliping før du begynner å montere. Jeg vil bruke korn 220 for en siste håndsliping etter at monteringen er fullført.
-
Viktig informasjon
Sørg for å lese gjennom de fullstendige instruksjonene før du starter noe arbeid med dette prosjektet. Mitt kostnadsoverslag for materialer er basert på bruk av grovtømmer som jeg bearbeider til riktige dimensjoner. Forhøvlet dimensjonelt trelast vil være dyrere. Husk også at kryssfiner kan være litt tynnere enn den angitte tykkelsen. 3/4" kryssfiner kan faktisk være 23/32". Så noen mindre justeringer av planene kan være nødvendig. En annen god praksis du bør bruke, er etter at den originale skrotten er montert, skal alle ekstra deler som er nødvendig kuttes for å passe. Selv om det ble gjort alt for å gjøre kuttdimensjonene oppført så nøyaktige som mulig, vil skjæring for å passe justere for eventuelle små avvik i monteringen.
-
Klipp ut ansiktsrammen
Fra 3/4" kirsebærtømmer skjær ut de 11 delene som utgjør ansiktsrammen. Ved hjelp av en stikksag eller båndsag kuttes benvinkelen på de to utvendige stilene. (benet er 6 tommer)
-
Legg til lommeskruehull og sett sammen
Bruk en Kreg-lommehullsjigg, bor lommehull i endene av alle ansiktsrammestykkene med unntak av utvendige stiler. Igjen er det en god idé å markere hvor hvert hull skal bores for å unngå feil. Sett sammen ansiktsramme med trelim og Kreg 1 1/4" fine lommeskruer.Jeg bruker toppen av bordsagen min til montering da den gir et stort flatt område å jobbe med.
-
Utvendig dørhengselrammestøtter
Skjær utvendig dørhengselrammestøtter fra 2" dimensjonal poppel. Hvis du ikke har tilgang til 2" dimensjonal poppel du kan laminere flere plater og kutte til endelige mål. Etter å ha fullført kutt, slip hengselrammene, bruk 150 korn for den siste utjevningen. Ved hjelp av trelim og bradspiker fester du rammene til fronten av den sammensatte skrotten som avbildet.
-
Fest ansiktsramme
Når trelimet er tørt, sliper du begge sider og alle kanter av ansiktsrammen og slutter med sandpapir med korn 150. Fest ansiktsrammen foran på skrotten med trelim og 1 1/4" brad negler. To ting å merke seg. Den første er at hvis kryssfinersidene av kadaveret er mindre enn 3/4" faktisk dimensjon ansiktsrammen kan være litt bredere enn slaktkroppen. Hvis det er tilfelle, del overlappingen jevnt på begge ender av slaktkroppen og fest deretter. For det andre vil du se at de utvendige dørkarmens hengselstøtter er 1/4" bredere enn ansiktsrammen. Ikke bekymre deg. Perlerammene som skal legges dekker innrammingen.
-
Å lage beading aksent
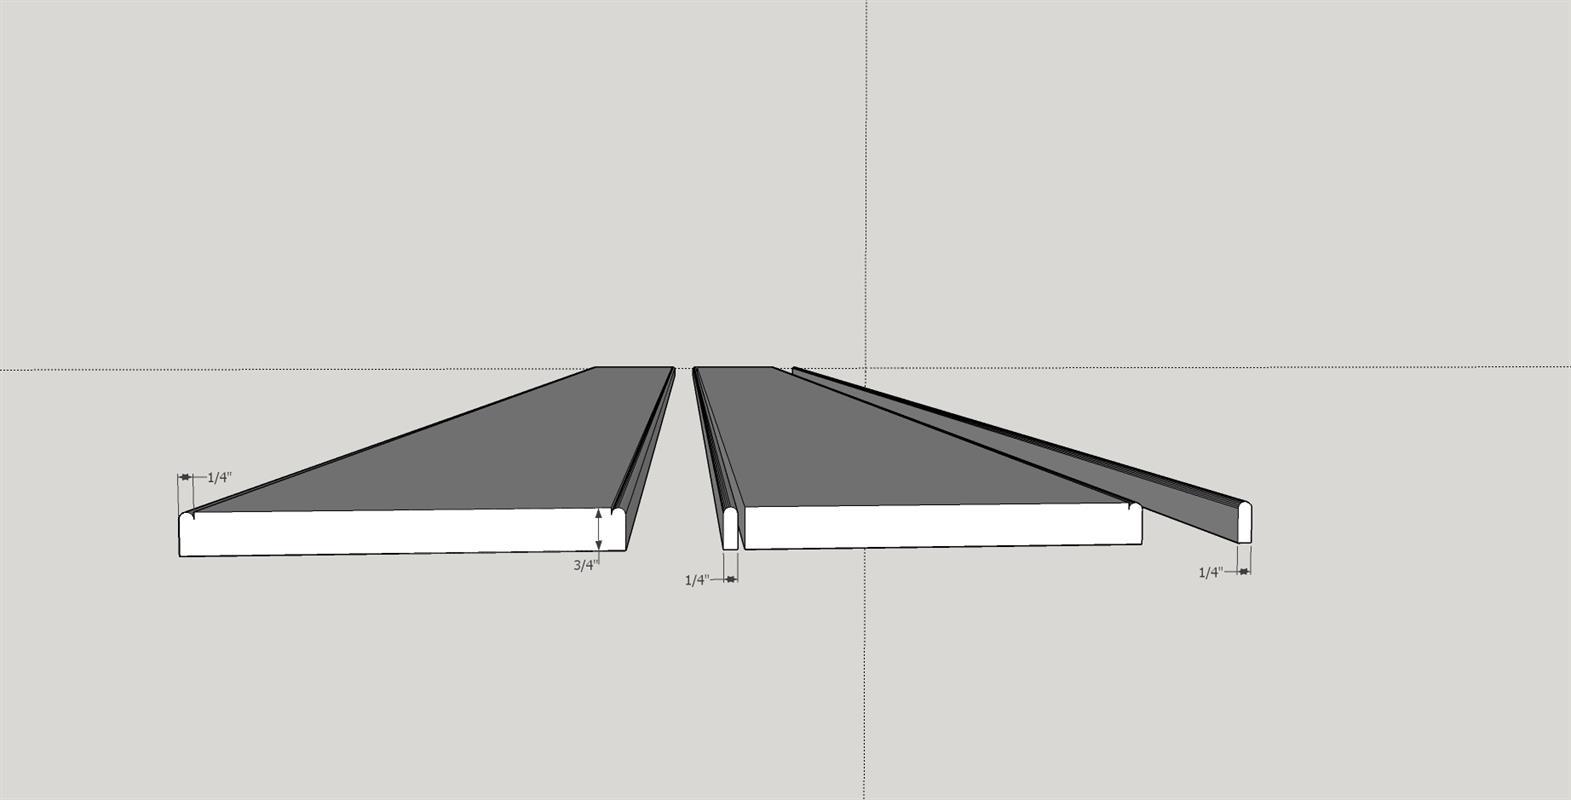
Perlerammene vil kreve over 34 lineære fot på 1/4" beading.For å produsere dette bruker jeg en Freud (80-102) 1/8" Radius Tradition Perlefresebit. Jeg monterer bittet i mitt Kreg-fresebord og setter klippehøyden til 3/8". Jeg starter med en 1 X 8 X 96" kirsebærbrett og kutt en perle på hver kant av brettet. Jeg bruker deretter bordsagen min til å rive et 1/4 tomme stykke av hver kant. Jeg gjentar denne prosessen to ganger til til jeg hadde 48 lineære fot perler (det er vanligvis en god idé å lage ekstra). Det er veldig viktig å holde brettet godt på plass når du skjærer. Jeg bruker Kreg fjærbrett på overfresbordet og et Grip-Tite Guide(TM) magnetisk fjærbrett på bordsagen. Bruk til slutt sandpapir med korn 150 for å jevne ut perlene.
-
Montering av perlerammene
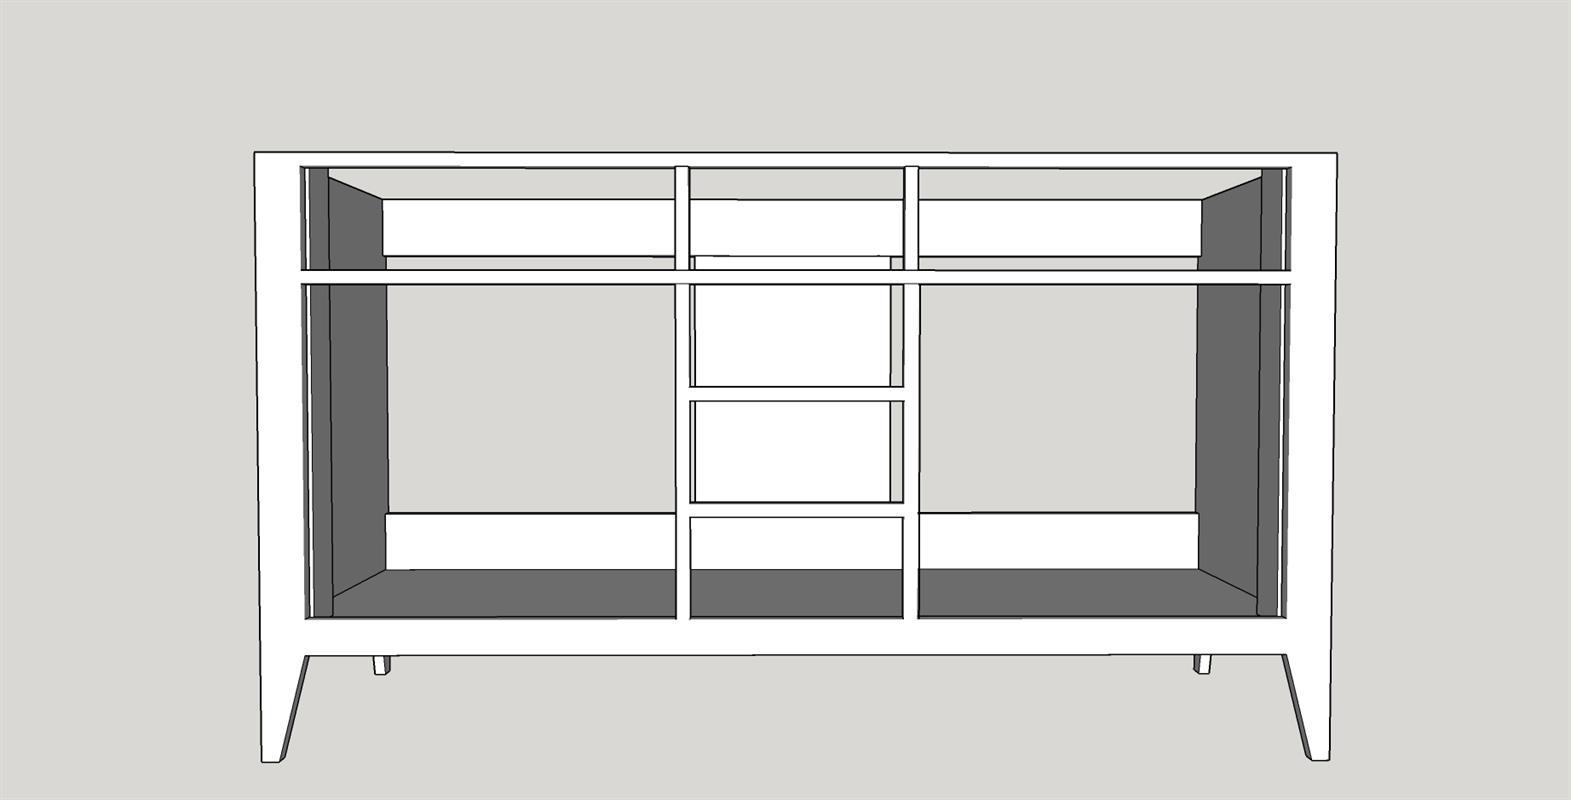
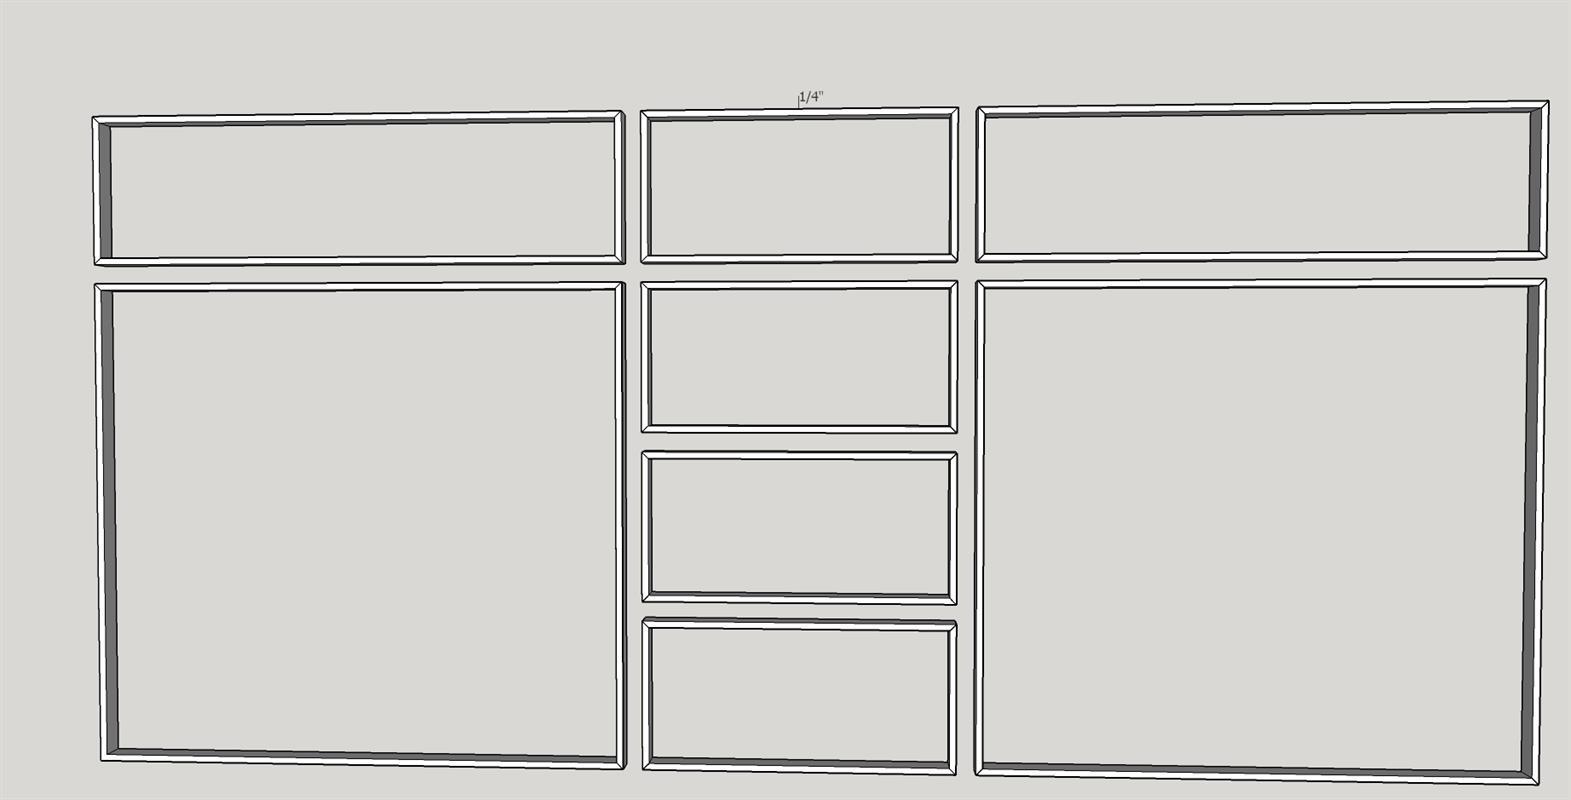
Begge døråpningene, de to falske skuffefrontåpningene og de fire skuffeåpningene er innrammet med perler. Dette oppnås ved å kutte perlene slik at de passer til hver side av hver åpning (alle kutt er 45 graders vinkler for å lage gjæringshjørner). Jeg lager alle 45 graders kuttene med min Bosch hoggesag (perlene ble vanligvis kuttet litt langt og nappet bort til hver del passer godt på plass). Når jeg har kuttet alle rammene og passet på plass, bruker jeg trelim og pinnegler for sluttmontering. Vær forsiktig for å holde perlene i flukt med fronten av ansiktsrammen.
-
Komplett karkus
Fyll alle brad- og spikerhull med en tresparkel av god kvalitet. La tørke og slip glatt med 150 korn sandpapir. Den ytre skrotten er nå komplett.
-
Skjær skufflys og holder
Jeg bruker tett korn, kvartsagt rød eik for å lage skuffholderen og lysbildene. Eik holder seg godt å slite og kvartsagt tre har større sannsynlighet for å holde formen og har mindre sannsynlighet for å vri seg eller vri seg. Ved å bruke bordsagen river jeg skuffslidene og holderen (øverste skuffguide) fra 3/4" eik. Jeg bruker så kappsagen min til å skjære i lengde.Så satte jeg opp bordsagen med dado-bladet og kuttet hele 1/2" X 1/2" kaniner i skuffen glir. Jeg pusser kaninene og påfører pastavoks for å hjelpe skuffene til å gli lett.
-
Kutt skuffens glidestøtter
Fra en 3/4" poppel bord kutte de fire skuffene skyve støtter. Bruk Kreg-lommehullsjiggen og bor lommehull i alle fire bord. Igjen er det en god idé å markere hvor hvert hull skal bores for å unngå feil.
-
Bygg skuffeslideunderenheter
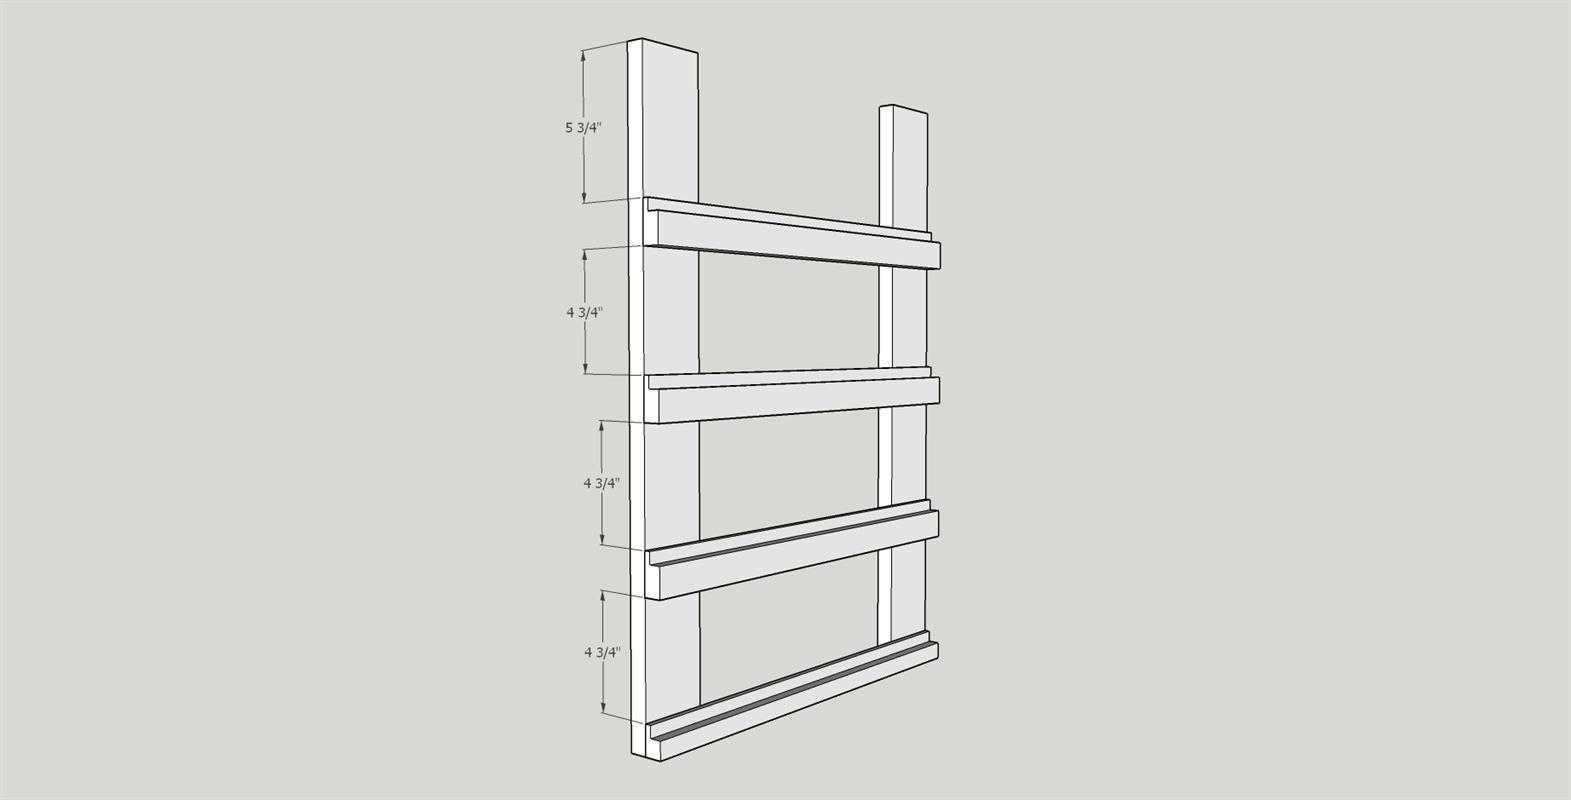
Vi bygger nå to identiske skuffeslide-underenheter. Den ene vil bli den venstre og den andre vil være den høyre forsamlingen. Begynn med å plassere det nederste lysbildet i flukt med de ytre hjørnene på støttebrettene og bruk en firkant for å sikre at de er riktig på linje. Bruk trelim og 1 1/4" brad negler å feste. (Sørg for at lommehullene i støttebrettene er på motsatt side av skuffeslidene og at lommehullene vender utover). For å sikre riktig avstand, bruk en 4 3/4" X 19 1/2" rektangulær mal på 1/8" masonitt (kuttet svært nøyaktig til mål og kontrollert for firkantet) for å plassere de tre andre skuffeslidene. Fest hvert lysbilde med trelim og brad spiker. Gjenta denne prosessen for den andre underenheten.
-
Plassering av skuffeslideenhetene
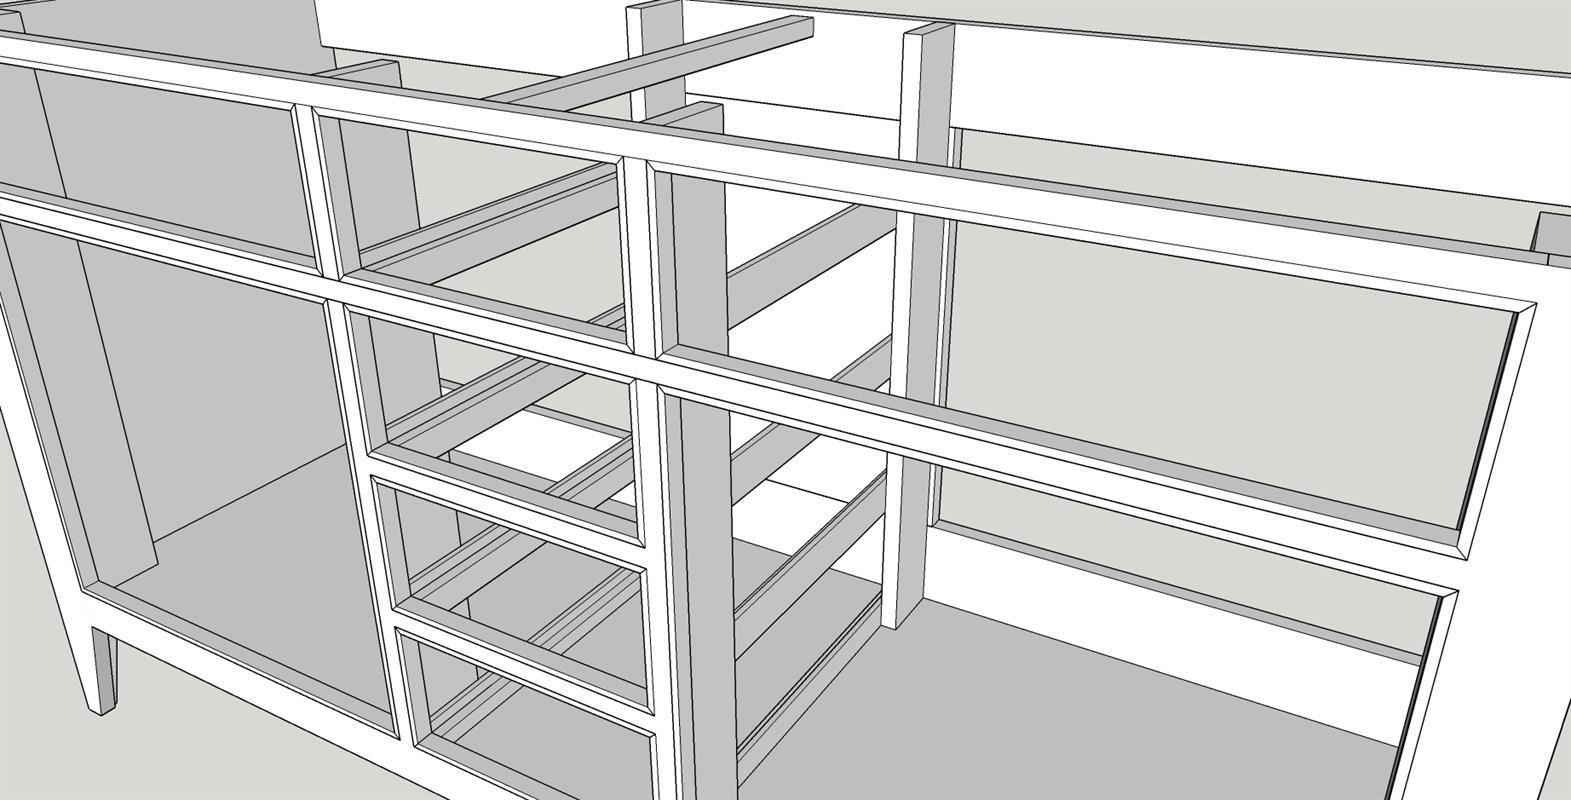
Hver skuff-slide-underenhet vil nå bli plassert i servantskrotten. Hvis vi målte og bygde riktig, bør vi kunne sette opp hver skuffeslide med det nedre hjørnet av hver skuffeåpning foran på servanten. Når du er ferdig med å sette dette opp, klemmer du enhetene på plass foran. Ikke klem baksiden. Bruk Kreg 1 1/4" fine lommeskruer for å feste fronten av enhetene. Du kan bruke en innrammingsfirkant eller en 19 1/2" X 10 1/2" rektangulær mal for å angi posisjonen til de bakre enhetene. (Sjablonen settes inn som om den var en skuff) Når alt er firkantet, klem de bakre enhetene og bruk Kreg 1 1/4" grove lommeskruer for å gjøre det endelige festet.
-
Montering av den øverste skuffholderen.
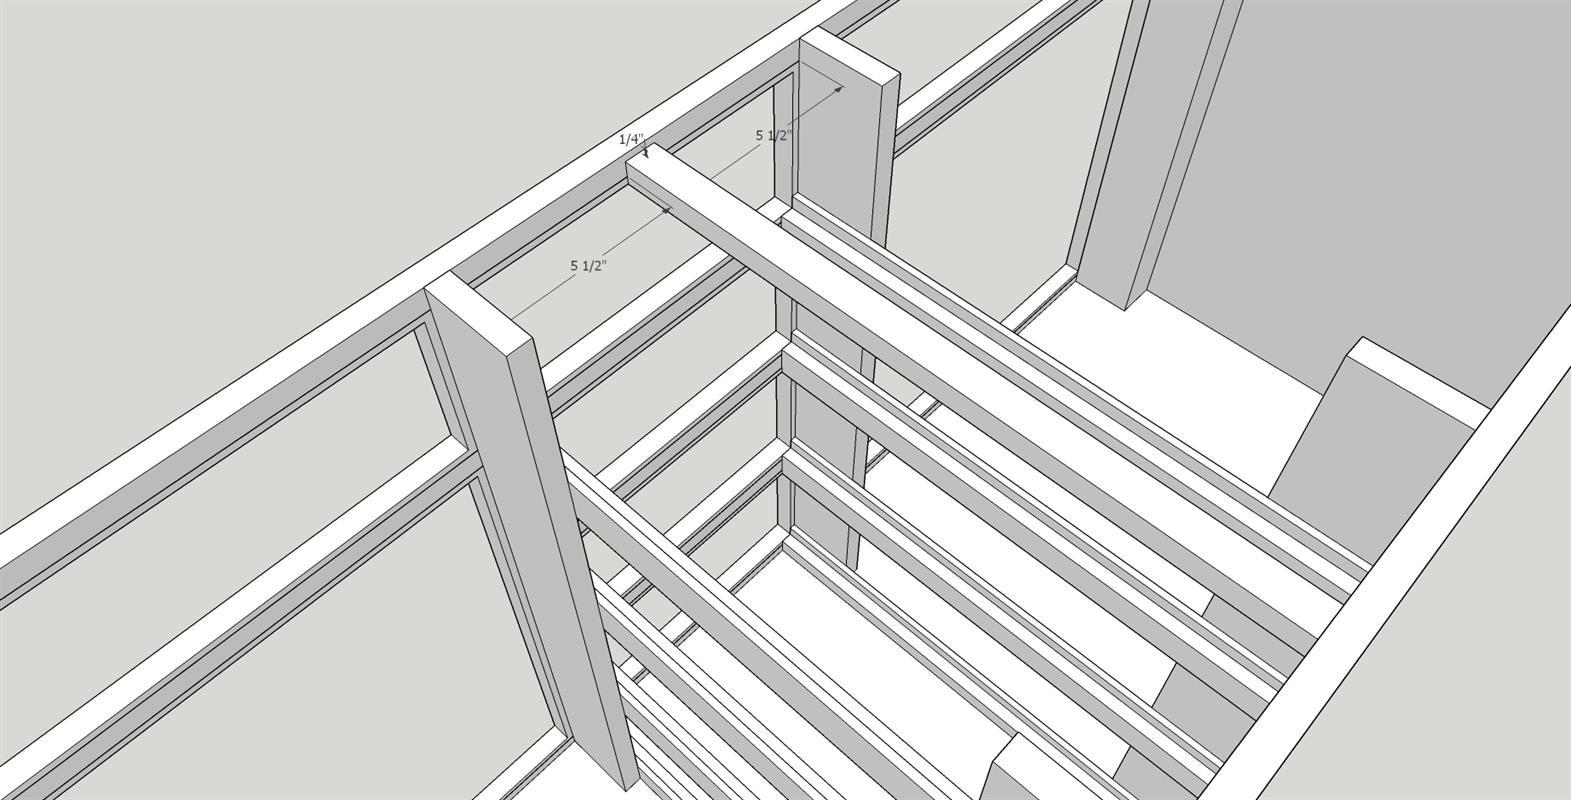
Installer skuffeholderen vi kuttet i trinn 17. Holderen skal passe tett mellom den øvre frontrammen og den øvre bakrammen. Den skal være sentralt plassert mellom de to glideunderenhetene og flush med perlerammen til den øverste skuffåpningen (ca. 1/4" ned fra toppen av ansiktsrammen og samme avstand ned i ryggen). Bruk trelim og brad spiker for å feste på plass.
-
Klipp skuffefrontene
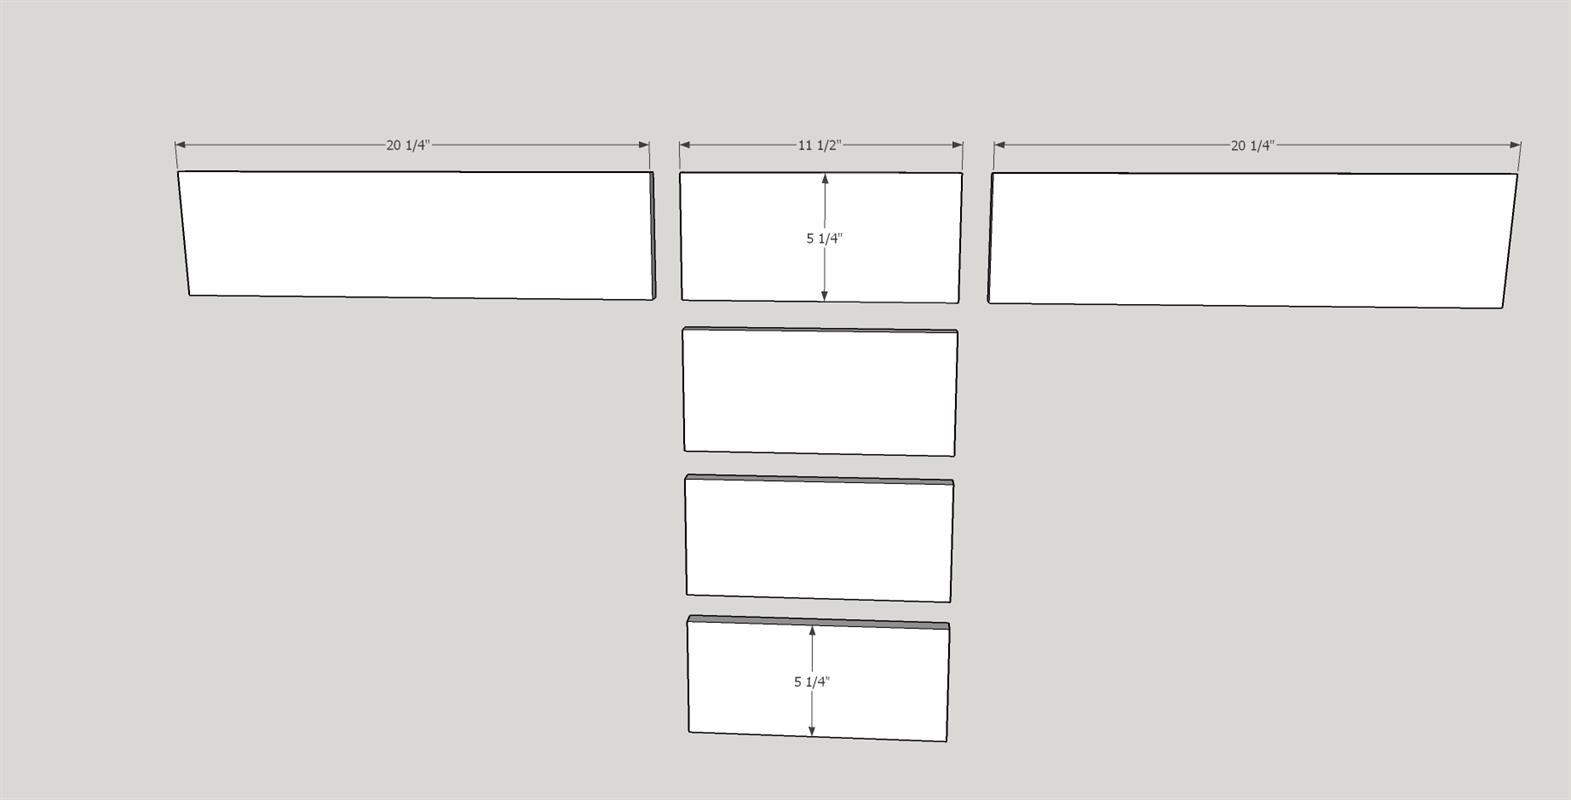
Skuffene lager jeg ved å bygge skuffebokser og legge skuffefrontene til de ferdige boksene. I dette trinnet skal vi kutte de to falske skuffefrontene og de fire skuffefrontene for den sentrale stabelen. Mål åpningene og kutt de to falske skuffefrontene slik at de passer godt til åpningene deres. Mål hver av åpningene i skuffestabelen og kutt skuffefrontene til 1/32" - 1/16" mindre enn åpningene. Etter kutting, monter alle skuffefronter og gjør de nødvendige justeringene for å passe ordentlig. Sand alle bitene som slutter med 150 grit for endelig finish.
-
Monter falske skuffefronter
Plasser de to falske skuffefrontene i åpningene deres. De skal passe i flukt med perlerammen.Bruk fire små treplater som er limt og stift spikret i hvert bakre hjørne av den falske trekkfronten for å feste hver på plass. Legg til et femte bord øverst i midten av døråpningen. Dette vil fungere som en dørstopper og vil holde dørene i riktig posisjon når de er lukket.
-
Bygge skuffeboksene
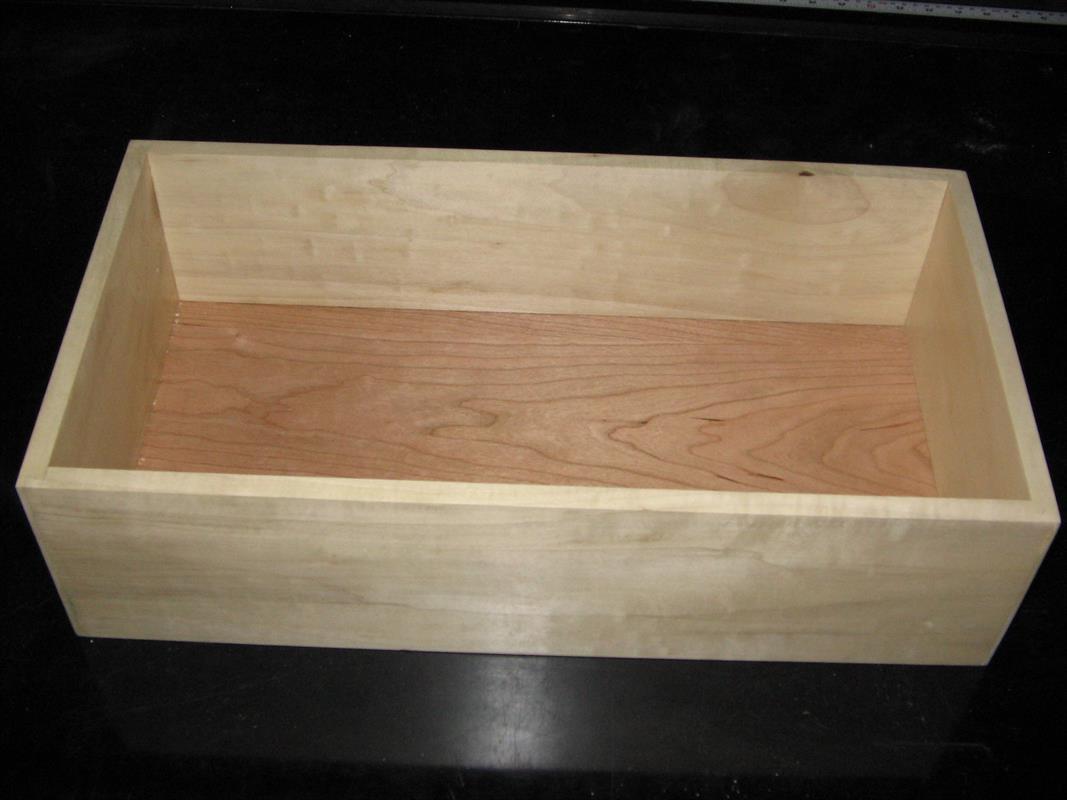
Klipp de åtte skuffesidene og åtte skuffens for-/bakside fra 1/2" poppel (du kan bruke 1/2" kryssfiner, men pass på tykkelsen siden den kan være litt mindre enn 1/2"). Klipp de fire skuffebunnene fra 1/4" kryssfiner. Vær oppmerksom på at størrelsene mine er omtrentlige og vil variere avhengig av hvordan du konstruerer boksens hjørner. Boksens endelige dimensjoner skal være 11 7/16" X 19 1/2" X 5 3/16". Jeg bruker en Freud (99-240) skuffelås på Kreg-overfresbordet for å kutte alle hjørnene. Jeg bruker så bordsagen min til å kutte en 1/4" dyp X 1/4 tomme bred dado i alle sider og fronter/baker. Denne dado skal være 1/4 tomme opp fra bunnen av hvert brett. Når du har fullført alle operasjonene, forbereder du alle overflater med 150 grit sandpapir.
-
Sett sammen skuffeboksene
Sett sammen med to sider, en bakside, en front og en bunn. Jeg bruker trelim ved hver hjørneskjøt og på kantene av kryssfinerbunnen. Du kan enten klemme til skuffene er tørre eller bruke stiftspiker i hvert hjørne. Gjenta denne prosessen tre ganger til til alle skuffeboksene er ferdige.
-
Monter skuffefronter
Sett den nederste skuffeboksen inn i rammen. Plasser skuffefronten i bunnåpningen. Bruk shims for å justere dørfronten slik at det er like mye plass på begge sider og topp til bunn. Plasser to 1" selvgjengende skruer fra innsiden foran av skuffeboksen inn i skuffefronten. Gjenta denne prosessen for hver av de gjenværende skuffene.
-
Kutt dørskinner
Kutt åtte dørskinner fra 3/4" kirsebær. Bruk deretter et Freud (99-036) justerbart not- og fjærbitsett montert i et Kreg-fresebord for å kutte fjærene og sporene i de åtte dørskinnene. Bitsene er justert for å kutte 1/4" X 3/8" riller og 1/4" X 3/8" tunger. Alternativt kan tungene og lundene kuttes på en bordsag. Avslutt slip med 150 korn sandpapir.
-
Skjær dørstiler
Klipp åtte dørstiler fra 3/4" kirsebær. Bruk deretter et Freud (99-036) justerbart fjær- og notbitsett montert i et Kreg-fresebord for å kutte sporene i de åtte dørstilene. Bitsene er justert til å kutte 1/4" X 3/8" riller. Alternativt kan sporene også kuttes på en bordsag. Avslutt slip med 150 korn sandpapir.
-
Skjær dørpaneler
Skjær fire dørpaneler fra 1/4" kirsebær kryssfiner. Avslutt slip med 150 korn sandpapir.
-
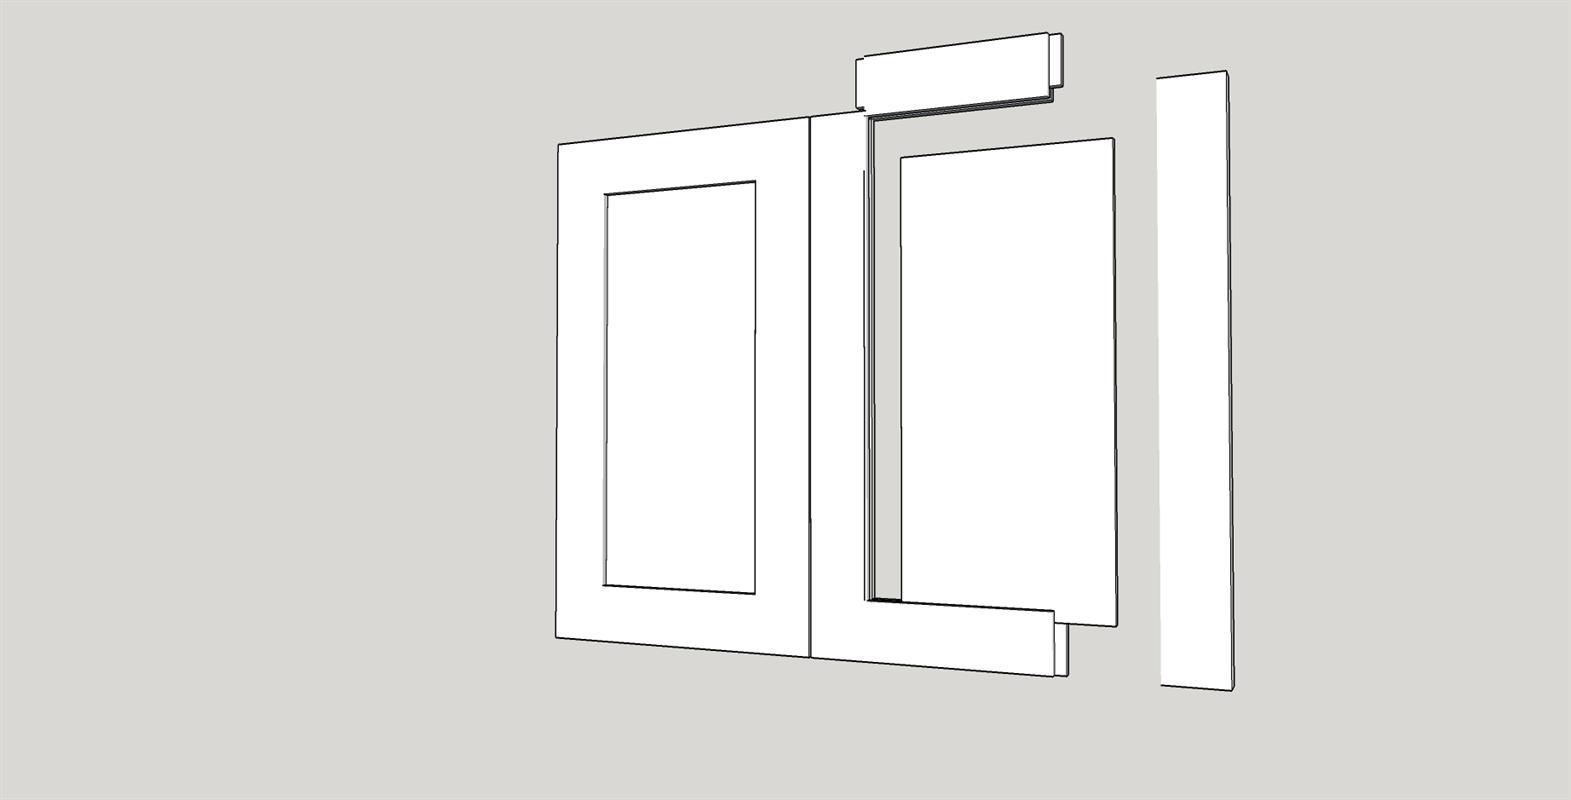
Sett sammen dører
Ved hjelp av to dørskinner, to dørstiler og et dørpanel monterer dørene. Plasser trelim i hvert hjørne der dørskinnetungene møter dørlistene og langs ytterkanten av dørfeltene. Klem på plass ... pass på at dørene er firkantede og om nødvendig juster og klem igjen. Gjenta denne prosessen tre ganger til til alle dørene er montert.
-
Montering av dørhengselskopper
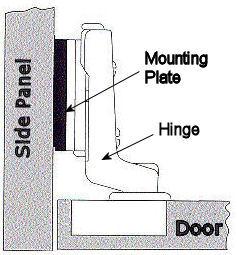
Plasser et sett med dører i begge åpningene. Merk hver dør slik at du kan holde styr på deres posisjon (eksempel: venstre sett venstre dør - LLD, venstre satt høyre dør - LRD, høyre satt venstre dør - RLD, høyre satt høyre dør - RRD) vi vil bruke denne posisjoneringen til å bore hullene for Euro-stilhengslene. Hvis passformen er tett, sett opp bordsagen og ta 1/32" av hver side. Sett sammen og sørg for at dørene har tilstrekkelig klaring til å åpne. På innsiden av hver dør markerer de stedene der hvert hengsel skal plasseres. Fjern dørene og bruk borepresse med 1 3/8" forstner bit for å bore de 8 hengselhullene med dimensjonene anbefalt av produsenten av hengslene. Bor alle 8 hull, fest hengselskoppene på plass. Plasser dørene på nytt.
-
Feste dører
Merk posisjonen til hengslenes monteringsplater på innsiden av skapet. Forbor små hull for skruene som holder monteringsplatene. Fest monteringsplater i henhold til hengselprodusentens instruksjoner. Etter at dørene er montert, bruk de forskjellige hengseljusteringene for å stille inn avstanden fra side til side og topp til bunn på alle fire dørene.
-
Fullfør
Nå som bygget er ferdig, bruk 220 sandpapir for å gjøre en gang over på alle overflater som forberedelse til finishen. Rengjør godt for å fjerne alt støv. (Jeg bruker trykkluft og rene tørre filler) Jeg valgte å bare bruke en fugemasse og la kirsebæret mørkne av seg selv. Jeg brukte Minwax Polycrylic Satin finish. Jeg ga servant- og skuffeenhetene tre strøk etter produsentens instruksjoner. Etter at finishen har tørket, legg til dør-/skuffetrekk.
-
Hvis du trenger å forsterke bena
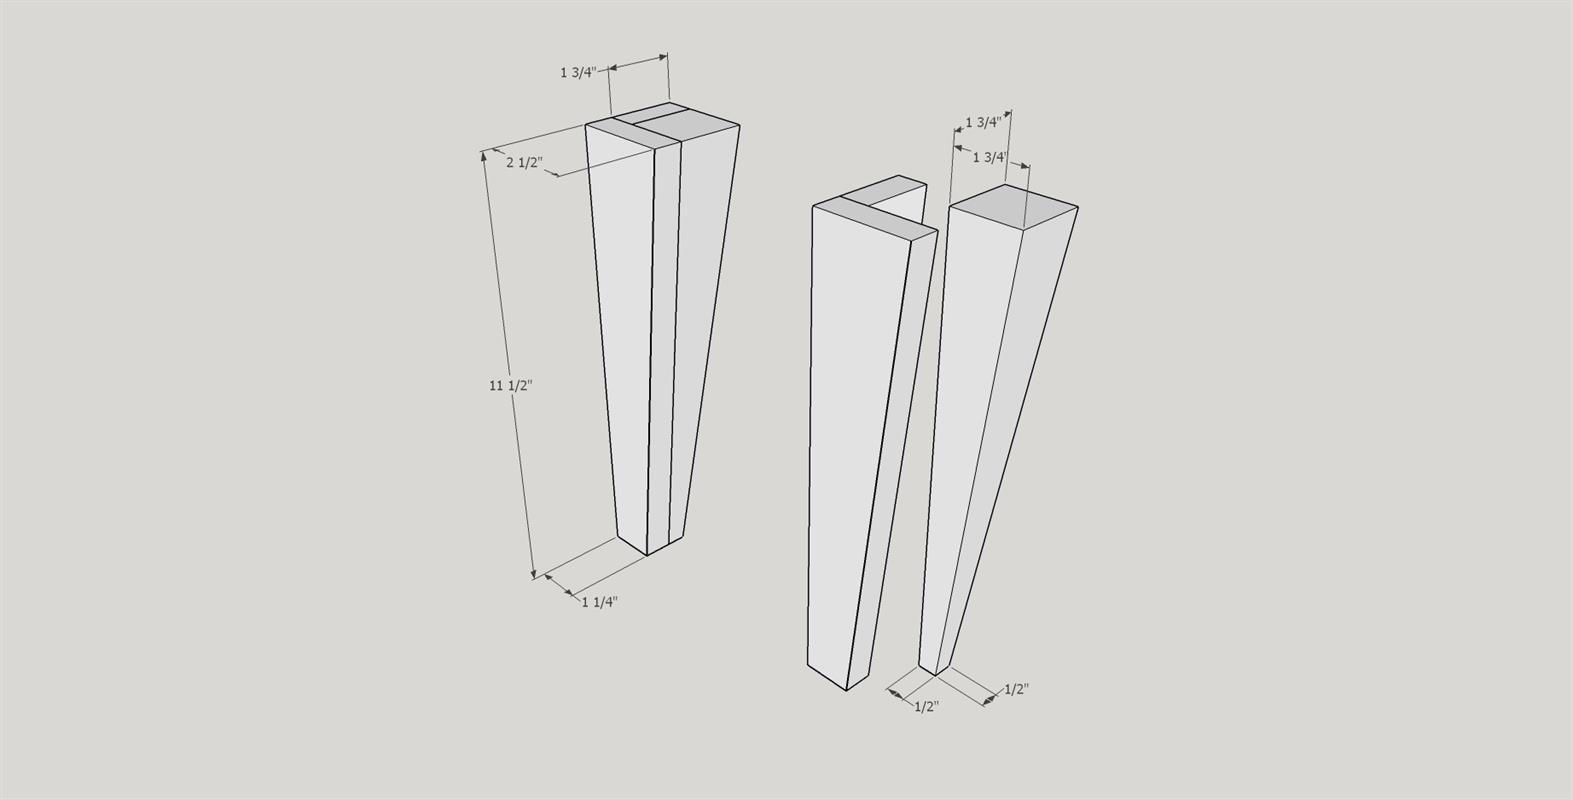
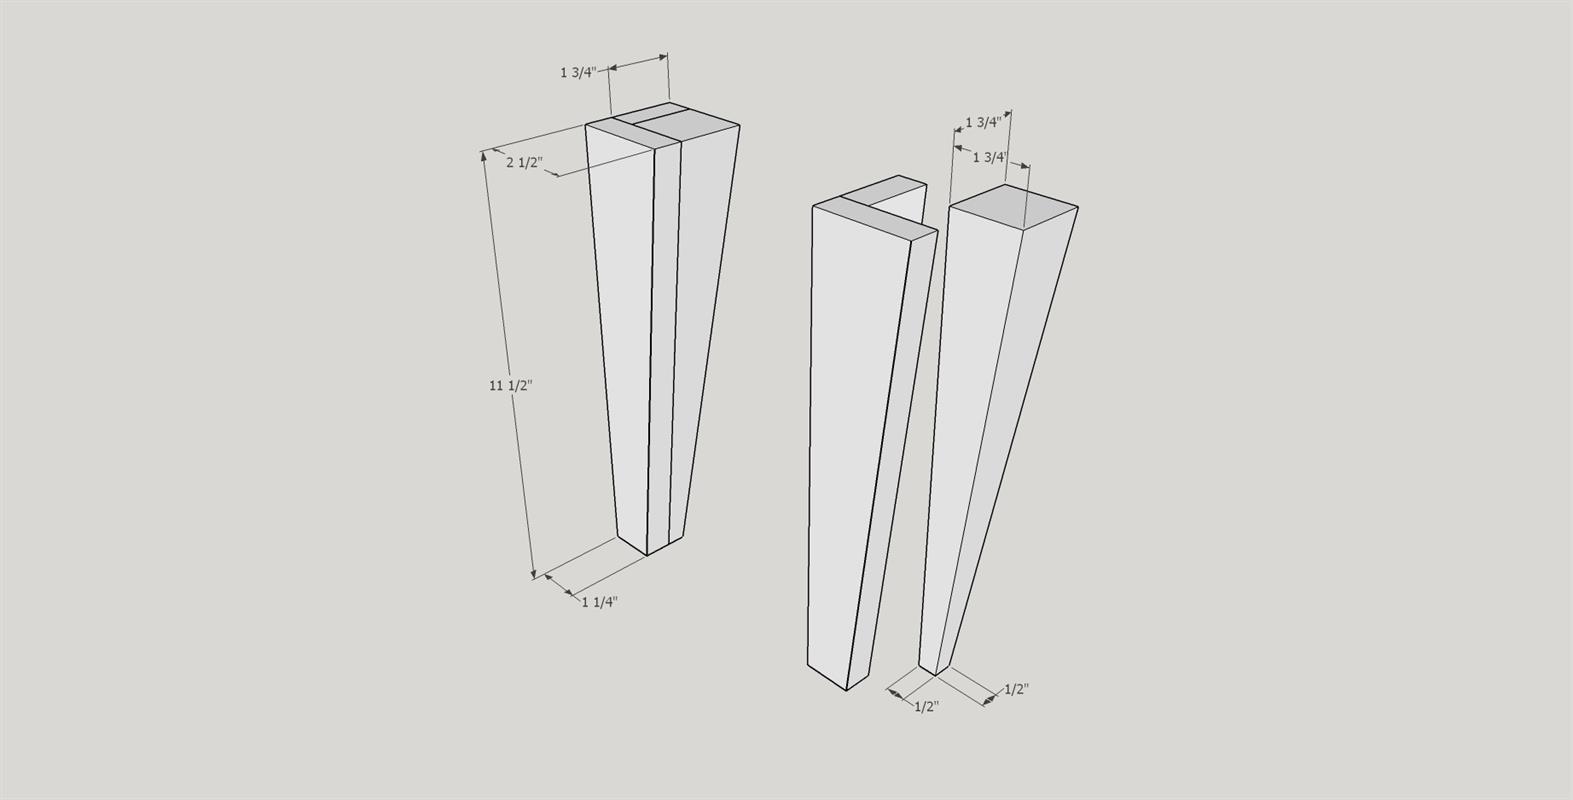
Jeg mottok en forespørsel om hvordan du kan gjøre bena sterkere hvis du skulle lage 11 1/2 tomme høye ben. Vennligst se vedlagte bilde med mitt forslag for å bruke en forsterkende blokk på baksiden av bena, samt å øke bunnmålet med 1/4 tomme.
-
Forsterkning av fremre ben
Som forespurt her er en tegning av hvordan du legger til en forsterkende blokk til forbena hvis du har laget bena 11 1/2 tommer høye. Vær også oppmerksom på at jeg har laget benbunnene 1/4" bredere for ekstra styrke.


Dele:
Barn som tråkker avføring